Multi Hyphenate Umami - Miso-Ginger-Garlic Meatballs in Sambal-Coconut-Tomato Sauce

I make meatballs of all kinds very frequently. Check my IG feed and you’ll see all shapes, sizes, and flavors of Kofta, SE Asian inspired Shrimp & Chicken, classic Italian with the trinity (veal, beef, pork), I could go on and on. It’s one of my favorite forms of food to make and Mark’s to eat. This recipe could be a riff on “Spaghetti & meatballs” but in reality it was born of me just wanted to bring together some of my favorite flavors, as it turns out that means there are a lot of hyphens required when you try to title this dish. Miso, ginger, and garlic is one of the best flavor combos on the planet (IMHO) and with pork as a vehicle it’s a guaranteed umami mega hit. The high panko content of these, which is intended to absorb and thereby retain all the flavor in the mixture, also acts to make these meatballs light, and almost fluffy, so it’s easy to scarf down quite a few. I also am obsessed with all kinds of sambal, there are all kinds ranging from sauces to pastes, but most always based in chilies and vinegar, and I love every single one. Sambal brings heat and bracing astringency to any dish and when combined with the acid and heat of tomato, it’s electric. I also love the richness that coconut milk brings to any dish and the luscious texture and mild flavor is the perfect balance to all the umami, heat, bite, and acid. The meatballs themselves would go well in many other dishes; salad, congee, soup, or even chilled noodles, so they can be made and enjoyed however you like. Enjoy!

INGREDIENTS

  • Meatballs

  • Makes roughly 24, 2” round meatballs, freeze any extra for another dish.

  •  

  • 2 pounds ground pork

  • ¼ cup white miso paste (+ more to taste)

  • ⅓ cup garlic, minced (honestly I probably used more)

  • 1 medium yellow onion

  • ⅓ cup ginger minced

  • 1 tsp. Ground black pepper (+more to taste)

  • 1 tsp. Ground white pepper

  • 1 ½ cups panko breadcrumbs

  • Canola oil for frying

  •  

  • Sauce & Noodles

  • 6 scallions, finely chopped (some greens reserved for garnish)

  • 1 Tbsp garlic, minced

  • 3 heads baby bok choy, rinsed well, leaves separated

    • You can substitute any green that quick braises relatively well like mustard greens, mizuno, even spinach.

  • 1 lb of your favorite dry rice or wheat noodle

  • 24 oz strained tomatoes (passata)

  • ¼ cup sambal oelek (or more if you can take the heat)

  • 13.5 oz. (1 can) coconut milk

  • 1 Tbsp. neutral oil 

  •  

RECIPE PREPARATION

Meatballs

  • In a mini food processor, pulse onion, garlic, ginger, and miso until a wet paste forms.

  • In a large bowl, combine pork, onion paste, and peppers, working with your hands until evenly combined. The mixture should be almost wet, don’t worry!

  • Add panko covering meat evenly to avoid clumps, then work in with your hands until evenly incorporated.

  • Form ~2” diameter meat balls and place on a lined tray.

  • Chill for at least 15 minutes in the freezer or up to 6 hours in the refrigerator.

  • Preheat oven to 350°F

  • Fill a high-sided frying pan with canola oil 1-1 ½” depending on the size of the meatballs.

  • Heat oil until shimmering.

  • Carefully add meatballs in batches avoiding splashing and crowding.

  • Fry for 1 minute, then using a slotted metal spoon move the meatballs around, turning them over until they are golden. This will happen faster than you think because of the high panko and onion content. 

  • Once golden, remove with the slotted spoon allowing the excess oil to drip away, and place on a lined baking sheet. 

  • Once all meatballs are golden, place in the oven and bake for ~15 minutes or until cooked through. Lower heat and keep warm until you’re ready to serve.


Sauce & Noodles

  • In a medium saute pan, over medium heat, heat 1Tbsp neutral oil until it just starts to shimmer. 

  • Add garlic and scallions and cook ~4 minutes until scallions are fragrant and begin to break down, stir often so the garlic does not burn.

  • At the same time, bring a large pasta pot of water to boil.

  • Add sambal, strained tomatoes, and coconut milk to garlic and scallions, mix in until well combined, lower heat and allow to simmer until smaller bubbles begin to form.

  • Add baby bok choy, submerge the leaves, and braise until tender ~4 minutes, stir as needed.

  • While sauce simmers, cook noodles, removing just a minute or two before it finishes cooking, when it still has some tooth, and add to warm sauce to absorb as much flavor as possible.

  • Transfer sauce with noodles to a serving bowl, top with meatballs, and garnish with reserved scallion greens and cilantro.

Sauce of the Summer (& Beyond) - Easy Lamb Ragù

I have been making this sauce almost weekly since the tomatoes came into season at the farmers market and I plan to keep up the habit as soon as the preserved jars hit the stands. This is just so simple and yet satisfyingly savory it’s hard to resist whipping this up on a lazy Sunday afternoon. The key to driving this addiction is definitely the addition of anchovies (trust me, it’s the umami secret ingredient) and the use of lamb which imparts a rich, gamey depth in no time to what is otherwise a quick sauce to whip up. I always make sure to grab a pound of lamb from Liberty Delight farms on Saturday mornings, so I know I’ve got something local to cook-up for Sunday dinner. I personally love oregano with lamb, so that is my herb of choice, but you can totally sub in or add rosemary, basil, sage, marjoram, or honestly a little thyme to add complexity to your taste. As for the pasta, I love anything Open Hand Pasta makes and I’ve served this with just about every shape of pasta imaginable and always douse it with plentiful pecorino romano. If using preserved or canned tomatoes, skip the confit part, and get right to cooking. 

INGREDIENTS

  • 2 Pints fresh heirloom tomatoes - cherry, campari, grape, or even large types are fine, just make sure they are totally ripe

    • You can also substitute with ~28 oz canned diced tomatoes, if so, skip the confit section.

  • 6 Sprigs fresh oregano

  • 1 lb Ground lamb

  • ½ cup + 2 Tbsp olive oil, divided

  • 12 oz. Strained tomatoes (passata)

  • 2 oz or 1 can of flat anchovy fillets in oil

  • 1 Medium yellow onion, roughly chopped

  • 1 Large carrot, roughly chopped

  • 6 + 6 Garlic cloves, divided

  • 1 tsp. Dried oregano

  • 1 tsp. Ground white pepper

  • 1 Tbsp. Ground black pepper

  • 1 tsp. Crushed red pepper (optional)

  • 1 lb. dried pasta or fresh pasta of your liking

  • Pecorino Romano & fresh herbs for serving

RECIPE PREPARATION

Tomato Confit

  • Preheat oven to 350°F

  • Line a shallot baking sheet or cake pan with foil. You want to use a pan small enough that it keeps the tomatoes together so they can be partially submerged in oil.

  • Place oregano and 6 garlic cloves on foil and cover with whole tomatoes.

  • Drizzle ½ cup olive oil over tomatoes, adding more until just the lower ¼ of the tomatoes are in oil.

  • Roast for 1 hour then turn the heat to 450°F and continue roasting until the skins begin to brown, about ~10 minutes depending on your oven.

  • Remove from oven and allow to cool before carefully removing oregano sprigs.


Sauce

  • In a small food processor, combine onion, carrot, 6 garlic cloves, anchovies with their oil, dried oregano, pepper, and the remaining 2 Tbsp. olive oil. Pulse until finely minced and well combined.

  • Place in a large pan over medium heat and cook until fragrant and onions are translucent, taking care not to burn - about 8 minutes, stirring occasionally.

  • Add the lamb and be sure to break up large pieces with a spoon or spatula. Cook for another 8 minutes or until browned. 

  • Add strained tomatoes and cook until simmering. Taste and add salt as needed.

  • Using a slotted spoon, add tomato confit and roasted garlic cloves and incorporate gently so as not to burst all the whole tomatoes. Reduce heat to low and cover to keep warm.

  • Cook pasta, removing just a minute or two before it finishes cooking to your preferred doneness, and add to warm sauce to absorb as much flavor as possible.

  • Serve immediately with pecorino romano and garnish with fresh herbs.


Mushroom-Gochujang-Kimchi Fried Rice

This recipe has been in HEAVY rotation since being inspired by (and adapted from) an episode of Good Eats Reloaded I watched last year and has proven to be a great way to make use of local treasures like Hex Ferment’s amazing Miso Kimchi, King Mushroom’s shiitakes, and Liberty Delight’s ground meats that I pick up at the Saturday market. The best part of this recipe is its versatility! You can add any greens or vegetables you happen to have around, crank up the heat with chilies or the funk with different kimchis, and most critically; use any ground meat or even tofu to make it vegetarian. This is another great meal in a bowl and works well for any meal from brunch to dinner.

INGREDIENTS

  • 16 oz ground chicken (or any ground meat or protein substitute)

  • 2 cups kimchi - Hex Ferments Miso Kimchi is the BEST

  • 4 large eggs 

  • 16 shiitake mushroom caps, thinly sliced (about 4 cups) 

  • 8 scallions, thinly sliced on the bias, greens reserved for garnish

  • 3 Tbsp. garlic, minced 

  • 1 Tbsp. garlic powder

  • 3 Tbsp. fresh ginger, minced

  • 1 Tbsp. tomato paste

  • 1 Tbsp. fish sauce 

  • 2 Tbsp. soy sauce 

  • 3 Tbsp. gochujang (I use Mother in Law’s brand Extra Spicy)

  • 2 tsp. toasted sesame oil 

  • 3 tsp. rice wine vinegar, divided 

  • 5 tsp. sesame oil or some other more neutral oil

  • 3 cups cooked rice 

  • 1 Tbsp. sesame seeds 

  • Cilantro, sliced Thai or Serrano chiles, or gochujaro (Korean chile flakes) for garnish

RECIPE PREPARATION

  1. Whisk together gochujang, sugar, sesame oil, garlic powder, and 2 teaspoons of rice wine vinegar in a medium bowl.

  2. Combine gochujang mixture with ground chicken and refrigerate for 30 minutes.

  3. Combine kimchi, tomato paste, and remaining rice vinegar, set aside.

  4. Whisk eggs with soy sauce until homogenous.

  5. Heat a large saute pan (or wok) over high for at least 5 minutes, then add 2 tablespoons of sesame oil followed by mushrooms.

  6. Sear undisturbed for 2 minutes then stir and continue cooking until they develop well browned, crispy edges, about 6 minutes. 

  7. Remove mushrooms from the pan and set aside

  8. Add 1 tablespoon sesame oil to pan, followed by the scallion whites, garlic and ginger and cook for 3 minutes.

  9. Add chicken mixture and cook until beginning to brown and cooked through. If adding vegetables or greens, add at this point and cook until wilted or otherwise “done”.

  10. When pan is almost dry, add kimchi mixture to pan and stir, scraping up any browned bits stuck to bottom of pan.

  11. Make space in the center and add eggs, stirring quickly to cook without burning

  12. Mix all ingredients together, cook for 2 minutes until warmed through and remove from pan, placing in a large mixing bowl.

  13. Heat remaining 2 tablespoons of sesame oil over high heat just until shimmering.

  14. Add rice to pan,  smashing it into a thin layer, and cook undisturbed until crackling, about 5 minutes (may take more time depending on the moisture content of the rice)

  15. Stir in the meat and kimchi mixture, just to heat through. 

  16. Portion into bowls, top with the crispy mushrooms, and garnish with sesame seeds and reserved scallion greens.

File_000 (2).jpeg

Homage to Bò Kho - Viet Braised Beef Stew

This homage to Bò Kho, inspired by renowned chef & author Andrea Nguygen and my good friend Jenni with whom I have spent hours discussing our love of all things Asian Comfort Food (@asiancomfort on IG), has come into regular rotation in my pandemic winter repertoire. This fragrant and slow braised stew has the perfect combination of heat (chiles), sweetness (brown sugar), umami (fish sauce), aromatics (anise, cinnamon, 5 spice, lemongrass, etc), richness (BEEF), and freshness (ALL the garnishes), so serve it with a piece of crusty baguette and you have yourself a WHOLE meal for ALL the senses.

A few notes:

  • Pro-Tip: Use beef shank if you can get it. It’s much fattier and more flavorful than chuck (stew meat) so it will lead to a richer stew with more delicate meat (extra points if you can get it bone-in and stew them in with the braise).

  • Key Step: Saving the marinade and then returning the hot browned beef cubes to it to soak it back up, then returning the marinade to the sauce is a great way to MAXIMIZE flavor.

  • Something Spicy: I LOVE heat, so I grind dried chile de arbol with my annatto seeds to make a hot red powder, this is optional but I highly recommend IF heat is your friend. Otherwise, add crushed reds to your tolerance.

INGREDIENTS

FOR THE MARINADE:

3  tablespoons Vietnamese fish sauce

1  tablespoon brown sugar

2  tablespoons grated fresh ginger

2  tablespoons Chinese 5-spice powder

1  teaspoon black pepper

1  tablespoon garlic powder

5  garlic cloves, minced

2  sticks lemon grass, smashed

FOR THE STEW:

3  pounds beef shank or chuck, cut into 1-inch cubes

2  tablespoons vegetable oil

6  shallots thinly sliced

1  28 oz can diced tomatoes

2  tablespoons fresh ginger, minced

1  teaspoon annatto powder

1  teaspoon ground chile de arbol (or crushed red pepper)

1 tablespoon tomato paste (optional)

4  star anise pods

1  cinnamon stick

2  bay leaves

1-2 lbs large carrots, sliced into  ½” rounds

½  cup thinly sliced scallions, for garnish

1  cup cilantro sprigs, for garnish

½ cup thai basil leaves, for garnish

1 or 2  Vietnamese, Thair or Serrano sliced thinly on a bias, for garnish

1 crusty baguette, for serving

RECIPE PREPARATION

  1. Prepare marinade: combine fish sauce, brown sugar, ginger, 5-spice powder, garlic powder, minced garlic, and pepper, whisk until well combined.

  2. Place beef in a large bowl, pour over marinade and ensure evenly coated, turning by hand

  3. Marinate for at least 30 minutes and up to 4 hours (in the refrigerator)

  4. Remove meat from refrigerator at least 30 minutes before preparing stew to allow to come to room temp.

  5. Pour vegetable oil in dutch oven (or large stew pot) over medium-high heat.

  6. Once oil is hot, brown the beef cubes in small batches ensuring good golden coloring on all sides. Reserve marinade in original bowl.

  7. Once all beef is browned, return to marinade bowl (this allows the newly browned meat to soak in more of the flavor).

  8. In the same pot (if there is not too much in the way of burnt bits, otherwise clean out carefully and add new vegetable oil) add shallots and minced fresh ginger to oil and beef fat while still hot over medium heat. Cook for ~5 minutes until translucent but not falling apart.

  9. Add tomato paste, annatto, and ground chiles and cook until mixture begins to darken.

  10. Add tomatoes, beef, and all remaining marinade to pot, top with 4 cups of water. 

  11. Add bay leaf, cinnamon, and anise pods.

  12. Bring to a boil, then reduce heat to slow simmer, cover with lid ajar, and cook for 1 ½ hours or until beef is fork tender (check broth and add more water if too much cooks off and your stew starts to look like sauce).

  13. Add carrots and simmer for another ~20 minutes or until just tender (do not overcook).

  14. Remove lemon grass, bay leaves, cinnamon stick, and anise pods before serving.

  15. Optional: Skim fat from surface of broth before serving or chill and remove congealed fat before reheating.

  16. Ladle into individual bowls and garnish with scallions, cilantro, basil, and fresh chiles.

  17. Serve with torn crusty baguette to soak up all the brothy goodness.

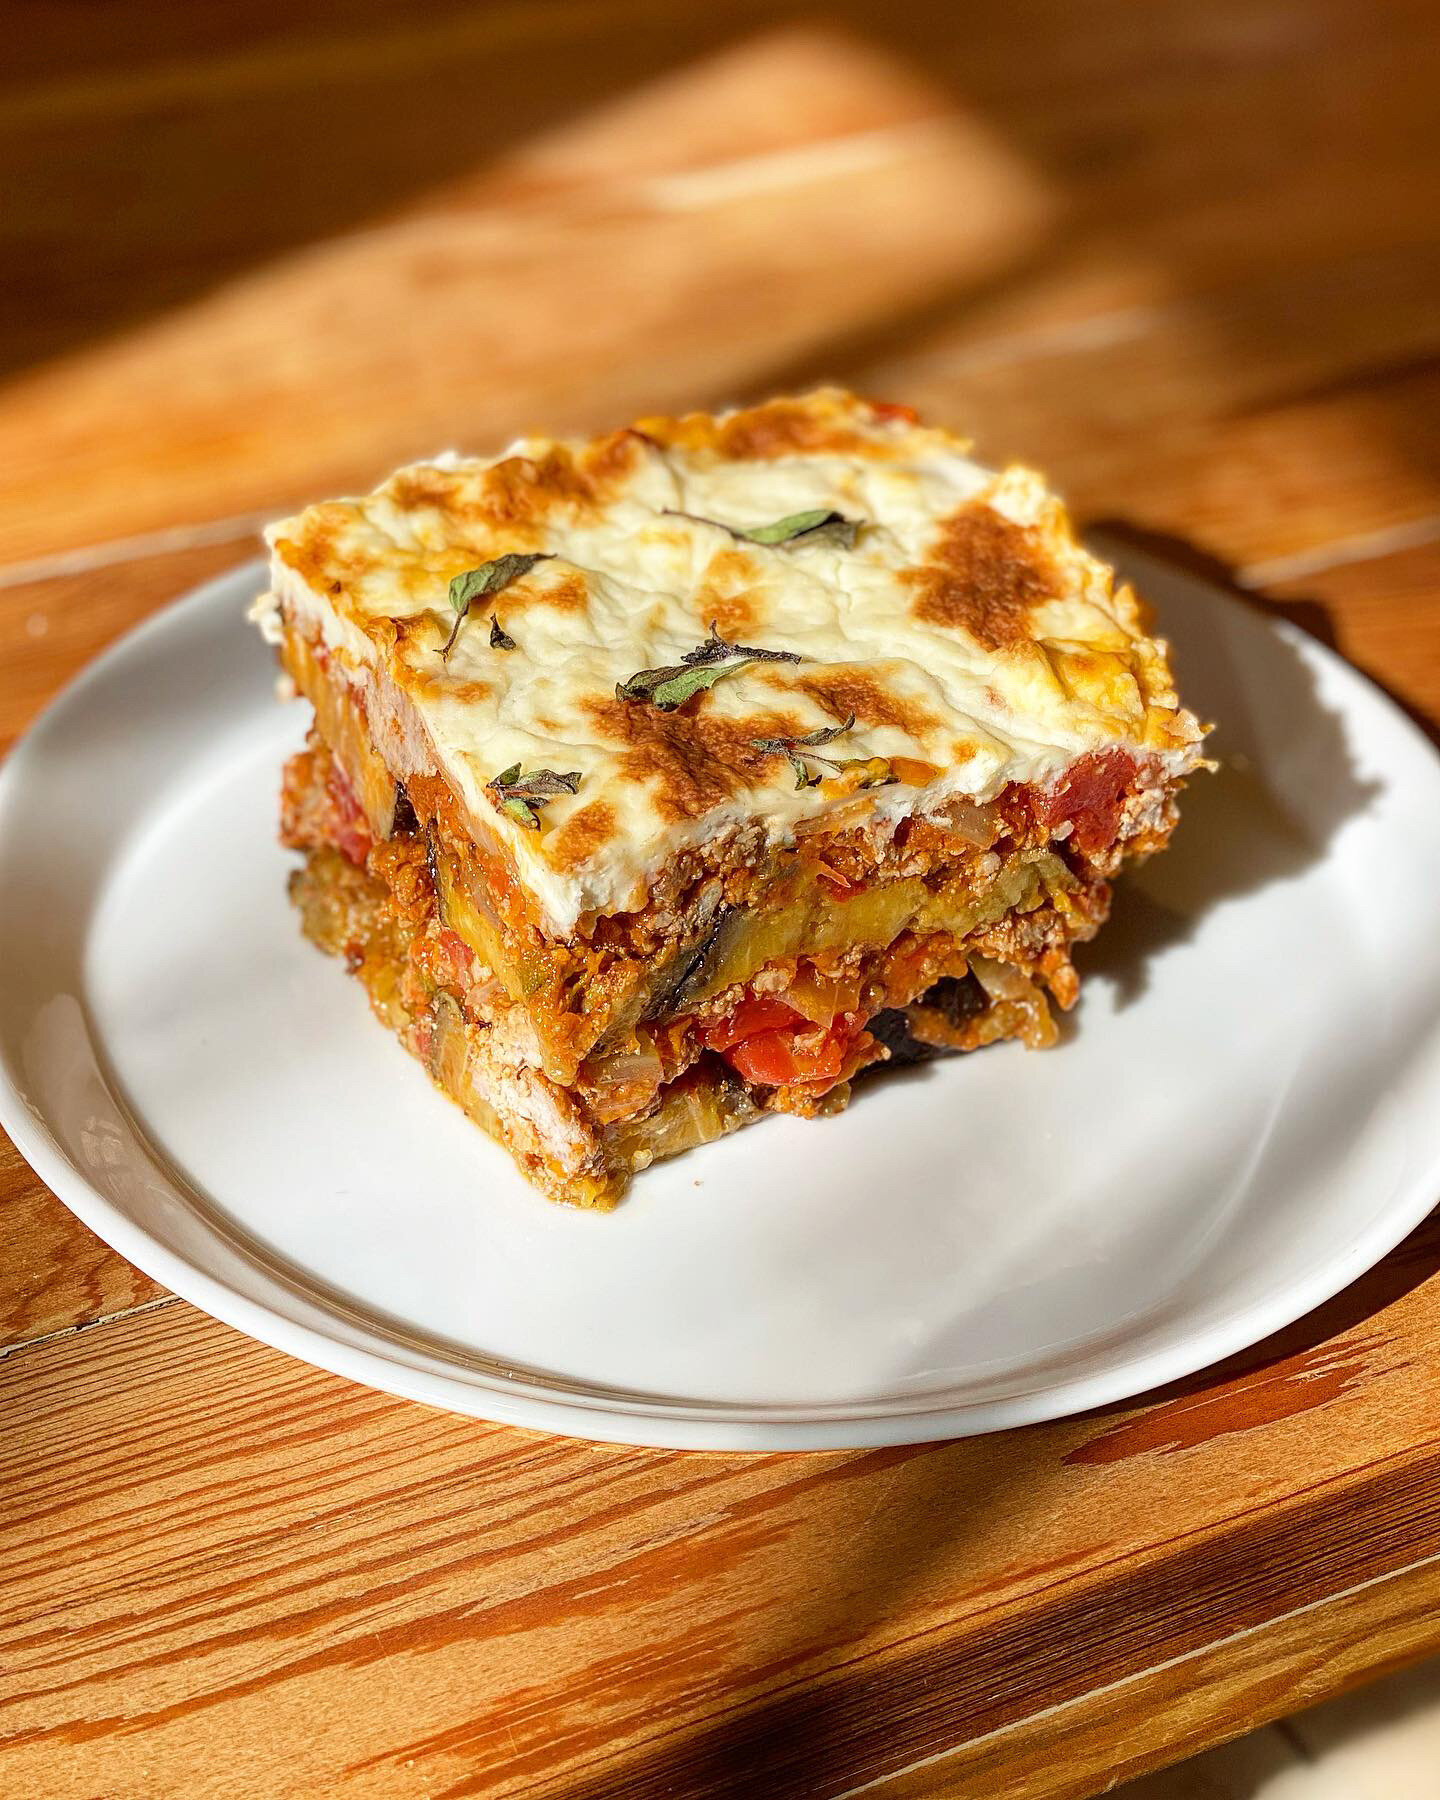
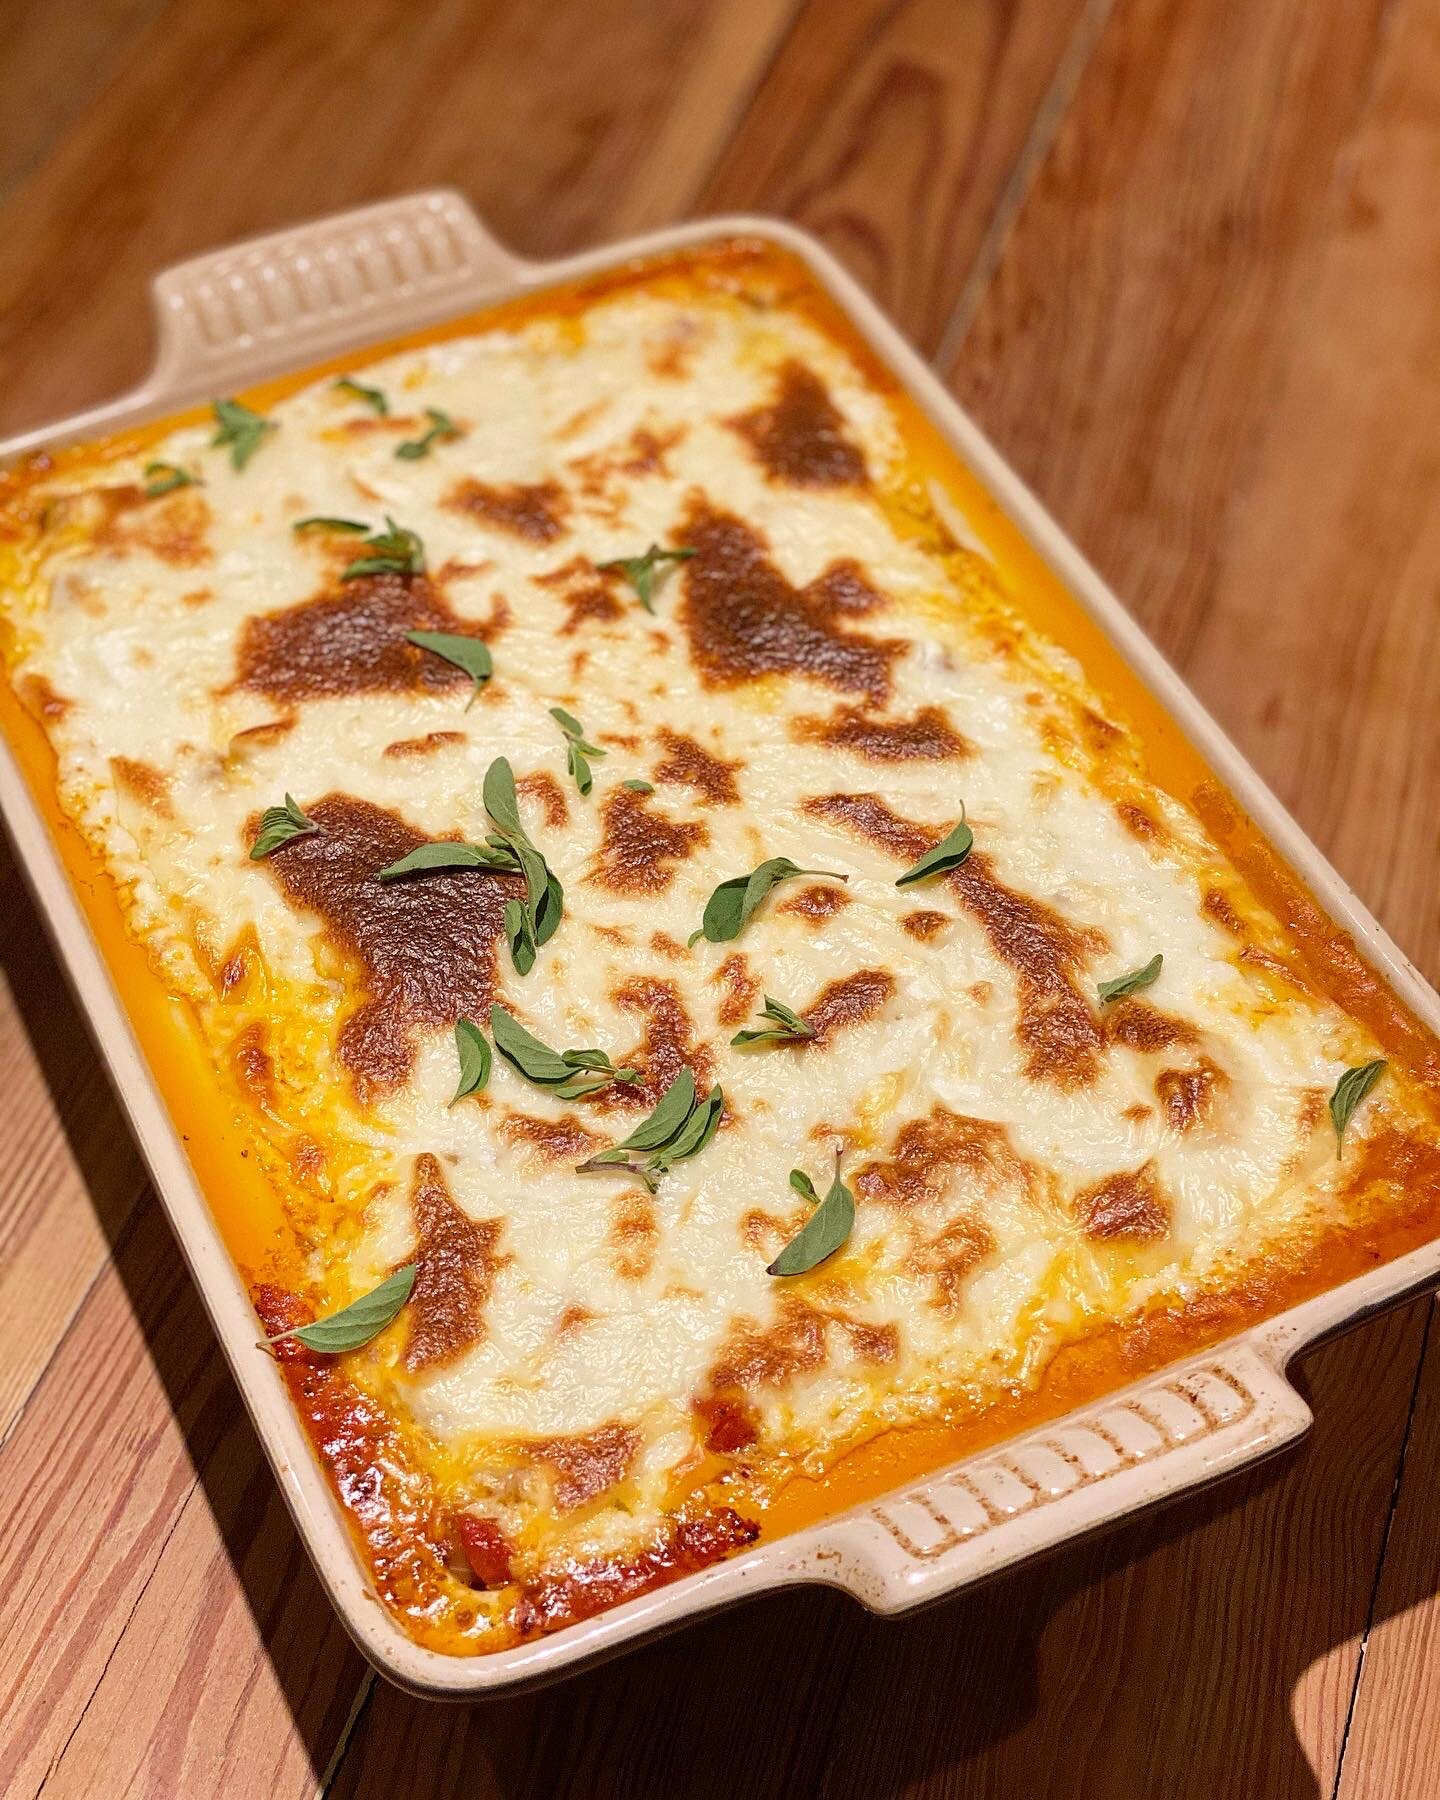
Lamb Moussaka w/ Goat Feta Béchamel

I’ve been using a TON of goat cheese in my recipes lately, and while I will be posting about the insane Khachepuri I’ve been making soon, I wanted to share this comfort food go-to dinner that I made this week with some of Charlottetown Farm’s tangy goat feta. Moussaka is one of my all time favorite Greek dishes (and my husband’s too), and though it may look complicated but this recipe makes it pretty easy to put something delicious together. As I do with all my food I add salt and seasoning to my taste as I cook, so don’t sweat the measurements, just taste along the way. Also, don’t be scared of the béchamel! I am stressed over so many different recipes and ruined so many batches but over engineering or worrying about precise measurements. Honestly, I eye ball it now. This béchamel turned out great, the feta melted but not entirely, so it resulted in a smooth but satisfyingly chunky sauce. Enjoy!

INGREDIENTS 

  • 8 garlic cloves, minced

  • 1 cup extra-virgin olive oil

  • 3 tablespoons dried oregano

  • 2½ teaspoons kosher salt, plus more

  • ½ teaspoon freshly ground black pepper, plus more

  • 1 teaspoon smoked paprika

  • 1 teaspoon crushed red pepper (or more to taste)

  • 3 medium eggplants sliced crosswise into ½-inch-thick rounds

  • 2 pounds ground lamb

  • 2 medium onions, diced

  • 1 3-inch cinnamon stick

  • 2 tablespoons tomato paste

  • 1 cup dry white wine

  • 1 28-ounce can diced tomatoes

  • 8 tablespoons butter

  • ⅓ cup flour

  • 1 ½ cups whole milk

  • 1 tablespoon grated parm

  • 6 oz goat cheese feta, diced

RECIPE PREPARATION

Eggplant & Lamb Sauce

  1. Combine garlic, olive oil, oregano, pepper, paprika, crushed red pepper and salt in a small bowl and whisk until well mixed.

  2. Preheat oven to 475°.

  3. Place eggplant slices on a large, foil lined baking tray (fine if they overlap).

  4. Using half of the oil mixture, pour over and brush all eggplants slices, flipping as needed (reserve remaining oil).

  5. Roast for 30-45 minutes until golden brown (you may add a bit more oil as needed), remove from oven and reduce temp to 400°.

  6. Meanwhile, brown the lamb in a skillet or large sauté pan, breaking up large pieces and ensuring fully cooked. (the pan should have decently high sides as this is where you will eventually make your sauce).

  7. Strain through a mesh sieve, reserving the fat in a small bowl. Place lamb meat aside.

  8. In the same pan, add ½ the lamb fat, remaining spiced oil and garlic mixture, onions, and cinnamon stick and saute until onions are translucent.

  9. Add tomato paste and cook until mixture begins to darken.

  10. Add white wine and cook until reduced by ½ and no longer smells of alcohol.

  11. Add tomatoes and lamb, mixing well and bring back to a simmer.

  12. Taste your sauce and add salt, pepper as needed.

  13. Simmer until reduced by ⅓ and resembling a thick meat sauce.

Assembly & Béchamel

  1. Drizzle remaining lamb fat on the bottom of a large casserole or baking dish.

  2. Place eggplant rounds on the bottom forming a single layer.

  3. Scoop lamb sauce and spread evenly to create a solid layer.

  4. Repeat with eggplant and meat sauce layers until you run out.

  5. Melt butter in a small sauce pan. 

  6. Add flour whisking constantly, cook until lightly browned and starts to smell nutty.

  7. Add milk ½ cup at a time, whisking constantly, cooking until thick (will coat the back of a spoon, and a finger swipe makes a clean line).

  8. Remove from heat, add feta and parm, stirring until smooth.

  9. Pour béchamel over top of Moussaka creating a smooth top layer.

  10. Bake in 400° degree oven for roughly 30 minutes until bubbling.

  11. If desired, moussaka can be broiled for 5 minutes to brown the béchamel to a golden crisp.

Crispy-Skin, Dry Brined, Chicken Confit

This is an incredibly simple holiday recipe that I use from November through to the New Year for all kinds of poultry and dining occasions. This example uses chicken for a rich and delicious any-night meal, but this technique works perfectly for anything from a mouth watering Thanksgiving turkey as a main course to duck legs as a decadent side dish for any holiday table. The brine can be made in large batches and stored for later use for a month or more. When using for other poultry, simply adjust cooking times for the confit preparation according to the particular protein or cut of poultry each time. This dry-brine technique allows the cook to impart deep flavor to the protein by letting it chill 12-24 hours, soaking in all the salty, spicy goodness without compromising the opportunity for crispy skin (as with a wet brine). Then, through the confit cooking, the result is a fall-off-the-bone tender bird that when quickly broiled, ends up with delightful crunchy, crispy skin. It’s the best of all flavor and texture worlds (plus it’s basically fool-proof level easy).

  • Prep time:15 minutes

  • Wait time: 12-24 hours

  • Cooking time: 2 ½ hours

  • Serves 4

Ingredients

Dry Brine

This makes almost double what is needed for the chicken. Use again on turkey, cornish hens or even a pork roast. The flavors here lean toward rich, warm, savory, with even a little spice, but can be adjusted easily depending on your or your guests’ particular tastes or preferences.

  • 2 Tbsp. whole black peppercorns

  • 1 ½ Tbsp. Whole White Peppercorns

  • ¼ cup plus 1½ tsp. Morton kosher salt

  • 1 tsp. Crushed red pepper

  • 2 Tbsp. garlic powder

  • 2 Tbsp. onion powder

  • 1 ½ Tbsp. dark brown sugar

  • 1 ½ Tbsp. smoked paprika

  • 1 ½ Tbsp Chili Powder

  • 1 tsp. Ground Cumin, Coriander, Cayenne to personal taste and ‘heat’ preferences (optional)

Confit

  • 4 large, fresh, chicken legs (quarters) skin-on

  • ~4 cups extra virgin olive oil

Preparation

  1. In a spice mill, finely grind peppercorns and crushed red pepper.

  2. Combine pepper powder with remaining dry brine ingredients until evenly incorporated. Pressing out any chunks of brown sugar with a fork.

  3. Place chicken, skin side up on a small, foil lined baking sheet. 

  4. Coat well with dry brine, patting by hands to ensure it evenly applied and well adhered.

  5. Chill, uncovered, in refrigerator for 12-24 hours so flavor can be absorbed and skin can dry out.

  6. When ready to prepare & serve; preheat oven to 275 F, take chicken out of refrigerator and remove dry brine using paper towel. This also allows for any excess moisture to be removed and ensures crispy skin. It’s ok if some brine remains on skin, just avoid so much as to cause a gritty crust.

  7. Place chicken quarters, again, skin side down, in a small shallow roasting pan (casserole or shallow dutch oven, anything oven safe works fine). When choosing pan size, ensure there is not too much space around chicken so as to avoid wasting excess oil.

  8. Pour oil into pan, filling until legs are ⅔-¾ submerged.

  9. Place in oven and roast for 2-2:30 hours depending on the size of chicken quarters (you can check doneness with a thermometer if you have any doubt of doneness after 2+ hours).

  10. Carefully remove pan from oven, oil should be bubbling.

  11. Place chicken quarters on a cooling rack over lined baking sheet. Use care as quarters will be delicate and prone to falling apart.

  12. Turn oven to broil on high.

  13. Place resting chicken quarters (cooling rack, baking tray and all) under broiler for 5-10 minutes until skin is golden, crispy, and beginning to brown (you may have to watch or check frequently to avoid burning).

  14. Serve immediately hot from oven or allow to rest until room temp, meat will be tender and delicious either way.

In the pictures you’ll see I served mine with collard greens, however, this preparation is amazing standing alone or with really any starch or vegetable side.


Ragù di Carne

Everyone’s probably heard of Bolognese sauce, and while it’s definitely one of my favorites I have cooked it and eaten it quite frequently, so, when I heard that we’d be making a meat sauce during a cooking class in Montalcino and few years ago, I was a little less than enthused at the lack of novelty. Mind you, we also made sformato di melanzane (eggplant ricotta custard), our own pasta, and roasted rabbit, so as a whole it promised to be amazing and unique, but I was prepared for the meat sauce aspect to be some kind of boring bolognese derivative. Boy was I wrong! Chef Hiro and the team at Le Ragnaie introduced us to a slice of Tuscan cuisine we had never fathomed before, it was incredible in so many ways, especially the Ragù di Carne. This recipe, which I have adapted slightly from the chef’s original, uses fresh roasted tomatoes, tons of herbs, and the secret ingredient  - pureed chicken livers - to add richness and depth. This sauce is excellent served with the traditional hand rolled pici, a store bought fettuccine, or mostly recently we enjoyed it with homemade ricotta gnocchi. It’s rich, savory, satisfying, and will become your go-to Sunday Sauce. 

INGREDIENTS

  • 1 lb ground beef

  • 1 lb ground pork

  • 1 lb italian sausage 

    • Bulk or links with the casings removed

  • 1 medium onion, quartered

  • 1 large carrot, cut into chunks

  • 2-3 stalks of celery, cut into chunks

  • 1-2 garlic bulbs

  • 1 can tomato paste

  • 10-12 roma tomatoes

  • Olive oil

  • 0.5 oz fresh sage, finely chopped

    • One grocery store package or 8-12 fresh leaves

  • 0.5 oz fresh rosemary, finely chopped

    • One grocery store package or 3 stalks

  • 2 bay leaves

  • Salt & black pepper to taste

RECIPE PREPARATION

  1. Preheat oven to 400°F. 

  2. Place whole roma tomatoes in a baking dish and drizzle with olive oil.

  3. Slice the tops off the heads of garlic, wrap in foil and drizzle olive oil inside. Place in the baking dish with the tomatoes.

  4. Roast for 45mins until tomatoes have burst and started to run. Set aside to cool.

  5. Using a food processor pulse onions, celery, carrots, and (once cool) soft cloves of roasted garlic until almost paste like. This is kind of a cheat step. I used to finely dice all these elements, but using the processor does it so much faster AND you end up with a much smoother mirepoix for the sauce.

  6. Heat about 2 tablespoons of olive oil in a large saute pan over medium heat.

  7. Add mirepoix paste and cook until translucent (~5 minutes).

  8. Add finely chopped herbs and continue to cook. 

  9. Meanwhile, pulse chicken livers in food processor or use an immersion blender until pureed. 

  10. Pour pureed livers into center of pan and cook, moving constantly with a spatula until cooked and incorporated with mirepoix (~2 minutes).

  11. Add the ground meats, breaking up with hands and tools to avoid chunks. Cook until meat is done and moisture is cooked off from the pan. 

  12. Add wine and tomato paste, mix well, and continue to cook until wine is mostly cooked off.

  13. Meanwhile, pulse roasted tomatoes in a food processor until pureed. You can strain through wide mesh if desired. 

  14. Add tomatoes to meat mixture and mix well. 

  15. Add bay leaves and salt and pepper. Now is the time to taste and add additional salt and pepper as needed. 

  16. Add 2 cups of water and simmer for roughly 20 minutes until water cooks off and sauce is thick and rich. (The perfect amount of time to cook pasta and grate cheese)

  17. Serve immediately with your choice of pasta and freshly grated pecorino romano.

Tortilla Española Brunch Style

Today’s recipe is inspired by tortilla española. So tortilla is not traditionally limited to being a brunch food. It’s kind of any time of day food and comes in many formats, as a tapa in and of itself, a filling for bocadillos, so many forms, it is really one of those ubiquitous foods of Spain and I love it. So our version is going to take it to a more omelette side of things with 6 eggs, a higher cheese ratio, and we are also going to throw in some Chorizo to give it a spicy and savory bite. If you are doing the vegetarian version or just like veg content, I suggested a few items to throw in like mushrooms or sauteed spinach that will enhance the dish. Finally, we’re going to season with some warm rich smoked paprika, garlic powder, salt and pepper. We are essentially taking the tortilla base, and making it a little more brunchy. This is such a simple recipe and the result is hearty and delicious, it’s become my go-to for anything breakfast or brunch related. Perhaps the best part is that it can be served hot out of the oven or chilled overnight if you want to make it in advance. If you want to see the tutorial, video can be found on YouTube here. I hope you Enjoy! The video can be found here

INGREDIENTS (Shopping & Prep List)

  • 6 eggs, beaten

  • 1 small onion, finely diced

  • 2-3 cups frozen shredded hash brown

    • You can make your own too, recipe supplement below

  • 1 cup chorizo, small dice (optional)

    • You’ll want smaller than bite sized pieces so that you can cut tidy slices of the finished tortilla. 

  • ½ cup grated manchego cheese

    • You can use any type of cheese that melts well, I would avoid swiss but really anything would pair well with this recipe.

  • 1 Tbsp. smoked paprika + more for garnish

    • I prefer Frontier Co-Op brand, Oakwood Smoked for it’s incredible rich flavor, available at Whole Foods and other retailers

  • 1 Tbsp. garlic powder

  • 2-4 Tbsp. olive oil 

    • This is a matter of preference and how quickly the shredded potatoes soak up oil, you should start with 2 Tbsp in step 7 and add more as needed.

  • Salt & pepper to taste

  • Vegetarian variation:

    • Use 1 ½ cups any combination of the below instead of the chorizo.

      • Sauteed spinach or arugula (excess water removed)

      • Chopped cherry tomatoes

      • Sauteed mushrooms  

      • Diced bell peppers

ESSENTIAL EQUIPMENT

  • Large mixing bowl

  • Non-stick spray (or butter)

  • Large saute pan/non-stick skillet

  • Large pie pan, casserole, or cast iron skillet

  • Spoons and spatulas for mixing and sauteing

RECIPE PREPARATION

  • 1. Preheat oven to 425°F. 

  • 2. Heat 2 tablespoons of olive oil in a non-stick skillet over medium-high heat.

  • 3. Add onion and cook until translucent while oil heats.

  • 4. Add hash browns to the hot pan and spread into an even layer. Season with salt and pepper and cook without disturbing for 3-4 minutes or until golden brown on the bottom.

  • 5. Use a spatula to flip the potatoes in several sections to cook the other side. 

  • 6. Add smoked paprika and garlic powder, cook for another 3-4 minutes or until golden brown and fragrant

  • 7. Remove from heat and allow to cool to room temp.

  • 8. In a large bowl, combine beaten eggs, chorizo, and cheese. 

    • At this point you could also add any vegetables you would like; chopped peppers, greens, mushrooms, or tomatoes would all be great additions. If you add greens like spinach or arugula, but I would ensure it’s cooked and the excess water drained or squeezed out, otherwise it will make for a mushy tortilla.

  • 9. Once potato mixture is cool, combine with egg and mix until evenly incorporated.

  • 10. Prepare a pie pan, casserole dish, or cast iron skillet by buttering or spraying with non-stick spray.

  • 11. Add egg and potato mixture, top with a bit more smoked paprika for color and bake for 20-40 minutes or until the center is set (some conditions may take more time)

  • 12. Once set, serve from the pie plate/casserole or carefully flip out of the skillet and upside down onto a plate. 

  • 13. Garnish with a dusting of smoked paprika

  •  

  • Serve hot, cold or room temperature. 

  • This dish is great to make in advance and can be enjoyed at any time of day reheated or right out of the fridge.

  •  

  • Make your own hash brown supplement:

  • 1. Grate 3 large yukon gold potatoes with a large cheese grater. Place in a large mixing bowl with cold water.

  • 2. Stir potato shreds around in the water to loosen the starch off the potato and drain off the starchy water. Refill the bowl with more cold water and repeat stirring and draining the potatoes.

  • 4. Drain as much water off of the potatoes as you can, drying them with paper towels or a clean dish towel if possible. You can even squeeze them between several layers of cheesecloth to remove as much water as possible.

Ekiben Inspired: Wood Ear Mushroom & Herb Salad

One of my favorite neighborhood spots to pick-up take-out has always been Ekiben, and I don’t know why but in this quarantine, it’s become a welcome weekly ritual. One of my favorite side dishes they serve is a deliciously tangy and herby Wood Ear Mushroom salad. The heat is just right and the mushrooms have this delightful bouncy texture. So, when I returned to the Sunday JFX market this weekend, and saw the bounty of wood ears at the mushroom stand, I knew exactly what I was going to attempt in my kitchen this week! I did a little googling to make sure I was aware of how to handle wood ears, learned about their place in traditional Chinese cuisine and medicine, and followed Ekiben’s lead for the flavor profile. Super simple, super delish, go try Eikben’s and then give this a try yourself!

INGREDIENTS

  •  

  • 4 cups fresh wood ear mushrooms, any tough stems removed 

    • (you can use re-hydrated as well)

  • 2 Tbsp. toasted sesame oil

  • 1 Tbsp. soy sauce

  • 2 Tbsp. white wine vinegar 

    • (rice wine vinegar or Chinese black vinegar would be preferable)

  • 1 tsp. Sugar

  • 3 shishito peppers, thinly sliced

  • 1 cup cilantro, finely chopped

  • 2 scallions finely chopped

  • 1 small shallot, minced

  • 1 tsp. garlic powder

  • 1 tsp. black pepper

  • ½ tsp, crushed red pepper (optional)

RECIPE PREPARATION

  • Bring 8 cups of water to a boil in a small/medium sauce pan. Add mushrooms and cook, stirring gently for about 5 minutes. Drain in a colander and rinse immediately with cold water to preserve texture. Set aside. 

  • In a medium bowl, combine sesame oil, soy sauce, vinegar, sugar, garlic powder, and black pepper, whisking until sugar dissolves. 

  • Add cooked mushrooms and toss until evenly coated.

  • Cover with plastic and refrigerate for 30 mins to 2 hours to allow to quick-pickle. 

  • When ready to serve, add shallots, peppers, scallions, and cilantro, toss until evenly incorporated. Serve immediately and top with crushed red pepper to taste.

Prelude to Summer: Pea & Herb Lamb Ragù with Rigatoni

So we certainly blew right past that single week of “windows open” good weather and are fully feeling the prelude to the sweatbox that is the mid-Altantic Summer. Despite my chagrin about the uptick in personal perspiration, the warmer temperatures do mean an ever increasing bounty is available at the local markets. My Saturday ritual visit to the 32 Street Farmers Market has born exciting new produce and products week over week. This recipe is inspired by some of this weeks prizes brought by the impending Summer. First off, the “Pea Man” of McCarthy farms in Caroline County was back at the market with his bright, cruncy, sweet freshly shucked peas, and I was able to score three pounds. It’s also scape season, which is fleeting but not to be missed. Scapes are the green stems from hard neck garlic, and they are a super versatile addition to any allium repertoire. You can eat them raw in salads, roast with a little olive oil, saute into a sauce (as in this recipe) or use as a substitute for garlic in pesto, for example, which I am planning on doing later this week. I found some gorgeous little green tentacles (it’s what scapes resemble, whatever) at the Farm Alliance stand and snapped them right-up. I also got my hands on some Liberty Delight Farms ground lamb. Liberty Delight is a local sustainable farm selling everything from rabbit to oxtail so I always make a pass by to see what inspires me. They typically grow all of their animal feed on the farm, and supplement with overflow from others nearby to reduce waste. It’s a model I definitely support as an alternative to sourcing from the industrial meat complex. I highly recommend checking them out, and for you meat lovers, they have a weekly farm share for all your carnivore needs. Rounding out the meal is the requisite pasta, this time a bag of Rigatoni, from you guessed it, Impasta Artisans, not officially my go-to carb brand. 

This recipe is super simple and intended to highlight the fresh ingredients I just described. I chose to go with oregano as my main herb to impact flavor, but as mint, rosemary or ther herbs also go well with lamb you could really go with whatever is fresh and abundant. I also chose to make this a rustic ragù in the form of a loose wine and butter based sauce, I felt like any additional acid like tomatoes or a cream would take away from the freshness of the scapes and peas. Finally, one important thing to note is adding the peas in late in the preparation. Peas are super easy to overcook, and quickly become mushy, nobody likes those over the age of 2. Not to mention, the fresh green beauties I picked up had such a lovely crunch, I definitely wanted to preserve their texture and color by only cooking until just warm. Check out the tutorial on my YouTube channel Christopher Cooks and Enjoy!

INGREDIENTS

  • ¼ cup extra-virgin olive oil

  • 2 tbsp. Butter

  • 1 cup grated pecorino romano - divided

  • ½ cup dry white wine

  • 2 tsp. dried oregano

  • 2 sprigs fresh oregano 

  • 2 pinches crushed red pepper

  • 2 cloves garlic, minced

  • 2 garlic scapes, small dice

  • 1 small shallot, minced

  • 1 lb fresh green peas, shucked and rinsed well

  • 1 lb ground lamb

  • 1 lb fresh pasta,

    • I used Rigatoni, but any shorter shape will work, I would not suggest anything long like linguini

  • Salt and freshly ground black pepper

RECIPE PREPARATION

  • Heat ¼ cup oil in a large saute pan over medium heat. Add shallots and cook, stirring often, for about 2 minutes. Add the lamb, garlic, and scapes and cook, undisturbed until lamb begins to brown, delglaze with white wine and cook until reduced by half. Reduce heat, add dried oregano, butter, ½ of the pecorino, crushed red pepper, and peas. Stir ensuring evenly incorporated and all ingredients are hot, remove from heat. Taste, and season with salt and pepper as needed.

  • Meanwhile, cook the pasta until just al dente or slightly under-done. Add to your sauce and toss ensuring pasta is evenly coated. Serve immediately topped with more pecorino & fresh oregano.

Spring AF: Spelt Pappardelle with Morels & Fiddlehead Ferns

If my Saturday morning IG stories are any indication, it’s pretty clear I have an obsession with King Mushroom stand at the 32nd Street Farmer Market. So much so, that I literally have a mushroom night on my weekly dinner calendar. Not only do they offer the best fungi and portrait-mode photo ops of the farmers market, but this spring they have been killing it with the additional seasonal offerings. The first wave of spring produce, the ramps were amazing, now it’s morels and fiddleheads, the Ina Garten in me just can’t get enough! This weekend I picked up those precious morels and the greenest little fiddle heads I have ever seen, along with my normal haul of oyster and maitake with really no idea what I was going to make with them. Queue the gorgeous weather today and will power to finally force myself on a run through the park and verdant streets of Fells Point. Maybe it’s because I am REALLY not looking forward to sweating my face off from Memorial Day until October, but I was feeling these late spring breezes, window boxes in full bloom, and sun-dappled ivy clad facades. So inspired I was that I decided to get Spring AF and use all my vernal ingredients in a simple pasta dish. I picked up some supple-looking spelt pappardelle from, you guessed it, Impasta Artisans, and figured an herby, leek & shallot studded, brown butter would be the perfect subtle sauce to bring it all together. The only thing that could have made this recipe more “Spring” is if I had added asparagus and scrounged up some ramps, but I showed restraint (for once). I hope this recipe inspires some mushroom hunting and oh-so-seasonal cooking fantasies! Enjoy. 

INGREDIENTS

  • 1 cup morels mushroom, whole

  • 2 cups oyster mushrooms, stems trimmed, sliced in halves or thirds

  • 2 cups Maitake, stems trimmed, broken apart

  • 1 cup fiddle head ferns

  • 1 teaspoon thyme

  • 1 teaspoon white pepper

  • 1 teaspoon garlic powder

  • 1 shallot minced

  • 1 leek whites and lightest greens, thinly sliced

  • 5 Tbsp salted butter

  • ⅓ cup olive oil

  • 1 package fresh pappardelle (likely close to a pound)

    • Preferably a long noodle like tagliatelle or linguini

    • Dry would work fine too, just plan for the extra cooking time

RECIPE PREPARATION

  • Heat half the olive oil in a large saute pan over med-high heat. You want to use a big pan so that the mushrooms are not crowded. Add maitake and oysters and cook, undisturbed until they start to brown, ~5 minutes. Flip and give a single stir to make sure none are sticking, and cook for another ~5 minutes until complete browned and starting to crisp. Remove from pan, scraping all the crispy bits out, and set-aside. 

  • Meanwhile, in a small pan melt 3 Tbsp butter, and immediately add the morels. Cook over high heat, letting the butter brown and the mushrooms cook until most of the butter is absorbed. Remove from heat and set aside. 

  • Back to the big pan. Add the rest of the olive oil, garlic powder, white pepper, shallots, leeks, and fiddle heads, cooking over medium heat for about 5 minutes or until the leeks start to brown. Move to the sides of the pan, and place 5 Tbsp butter into the center allowing it to melt and brown while not burning the vegetables.

  • While shallot mixture cooks, drop your pasta in boiling water for 3 minutes. Once butter is browned, add the reserved oyster and maitake mushrooms, and drop in the cooked pasta, stirring gently to incorporate. Serve immediately, garnishing with the butter fried morels.

Taco Therapy: Arrachera with Roasted Poblanos & Spring Onions

Instagram reminded me yesterday that it was 6 years ago, right around this time of year, that I left Baltimore and moved into a hotel room in Guadalajara, Mexico. This was a place that would be my home off-and-on for the next 3 years. So began my love affair with Mexico and GDL in particular, a place and people that continue to draw me back time-and-time again. Maybe it’s the isolation or inability to travel that’s got me nostalgic, but I decided to let dinner take me back to La Perla Tapatia for the evening. So last night we enjoyed Arrachera, a delicious preparation of marinated skirt steak found in everything from tacos to tortas to the fine-dining table, it is a dish as beloved as it is ubiquitous in Guad. As I made this dish I could almost hear the Mariachis...🇲🇽

INGREDIENTS

FOR THE BEEF

  • 2 ½ lbs beef skirt steak

  • 10 stalks of fresh oregano (½ bundle), leaves removed from stems

  • 1 Tbsp Adobo or Carne Asada style seasoning

    • I bought mine from Mama Coneja in Guadalajara, but Goya brand or anything similar should be fine (garlic, cumin, coriander, pepper, etc.)

  • 1 Tbsp dried oregano

  • 1 tsp garlic powder

  • ¼ cup lime juice

  • ½ cup olive oil

FOR SERVING

  • 1 cup white onion, finely chopped

  • ½ bunch fresh cilantro, rinsed well and finely chopped

  • 1 tsp dried oregano

  • 1 tsp crushed red pepper

  • 5-10 spring onions, rinsed and trimmed

  • 2-4 poblano peppers, halved and seeds removed

  • 2 Avocados

  • Tortillas

RECIPE PREPARATION

  • Place beef in a large glass or ceramic casserole pan. Salt both sides, and press oregano leaves onto the flesh. Chill, uncovered for 6 hours to allow the salt to draw the moisture out, then seep back in.

  • Combine olive oil, lime juice, seasoning mix, garlic powder, and dried oregano in a small bowl. Pour over meat and ensure all sides are coated. Cover, and marinate for at least 2 and up to 6 more hours in the refrigerator. When you are ready to cook, remove beef at least 1 hour prior to allow it to reach room temperature before grilling.

  • Combine chopped onion, fresh cilantro, crushed red pepper, and dried oregano in a small serving bowl, set aside.

  • Grill or roast spring onions, drizzled on olive oil, until bulbs begin to become soft and skins become golden. If roasting, I would recommend a 350-375F degree oven, for about 30 minutes. Repeat with poblanos and slice thinly. Combine onions, poblanos, and a bit of salt  in a bowl or oven safe dish to keep warm if not serving immediately. 

  • Heat a grill or grill pan until very hot. Place beef on hot surface and grill for 4-6 minutes per side until medium rare (or your preferred temperature). Allow beef to rest at least 8 minutes before cutting. To serve, slice on a bias against the grain roughly ½” thick. You want the meat to be manageable and fit well in a tortilla.

  • When ready to serve, carefully heat tortillas over a stove top flame until they start to puff and take on color on the edges. Wrap in a clean cloth napkin, towel, or tortilla basket. 

  • Serve meat on a platter with warm onion and poblano mixture so the respective juices can mix. Serve onion and cilantro mixture as well as sliced avocado on the side. Assemble tacos with meat and both warm and cool sides; enjoyed either inside the tortilla or on their own. 

Time Crunch & Rice Wrappers: Lemongrass Pork Spring Rolls

My approach to meals during this time period we’re in, I don’t even know what to call it, is to cook during the week nights and order take-out on the weekends. That way I have something to look forward to when I finish the workday and take the single step from computer to kitchen, and we get to support our neighborhood restaurants on a regular basis. I shop on Saturday mornings and meal plan on Sunday evenings based on what I’ve managed to find, what ingredients or magazine articles inspired me, and what evening social events are on the docket, just kidding, that last one is a joke…there are no social obligations to navigate (whimpering laugh).

Given that instead of meal planning, I spent this Sunday night drinking wine and pampering myself with drug store brand luxuries during a much needed “Spa Night” with my husband, I started this work week a little bit behind the 8-ball in the kitchen department. It certainly didn’t help anything that I also ended up sitting around most of Monday evening stressing about work and watching Dead to Me until nearly 8pm, giving nary a thought to dinner that night or any other for that matter. Faced with this reality and the clock creeping toward 8:15, I naturally, asked my husband what he wanted for dinner, with the foolish hope that he’d suggest take-out and absolve me of any work. No such luck, I received the “uhh whatever you like” which translates to “I have no opinion and just figured you would handle any and all things related to food, I don’t understand why we are still engaging on this topic” and so I was once again, and not surprisingly, back at square 1.

This is all to explain that this recipe is born out of a need to get dinner ready in less than 45 minutes, and the need for it to be light given the fact we would be eating at 9pm (we are only aspirationally that European folks!). I decided to make use of some spring roll wrappers and mung bean strands from the way back of the pantry, aging lemon grass, the last of some shrimp and green curry pastes from the fridge, and recently acquired ground pork and vegetables from the farmers market - just hoping it would all come together in the form of spring rolls. I figured I would look to my favorite Laotian dishes like larb and Vietnamese restaurant dining experiences as inspiration for the flavor profiles, and I think it was a success. This recipe is intended to be a rough guide, more of a “this is how I did it” rather than a prescriptive instructional in this case. Skip the shrimp or green curry paste, pump-up the heat with Thai chiles, or sub in some tangy pickled veggies, you really can’t go wrong. To be clear, this is by no means an authentic recipe, nor is that my intention, but rather this is an example of how I turned a time crunch, my love and reverence for the flavors south east asian cuisine, and a half-stocked pantry, into a delicious dinner neatly fit into a rice wrapper. Hopefully this recipe inspires you to get creative!

INGREDIENTS

  • 1 ¼ lbs ground pork

  • 1 tsp shrimp paste

  • 1 tsp green curry paste

  • 1 lemon grass stalk, smashed and minced

  • 1 Tbsp garlic, minced

  • 1 small shallot, minced

  • 1 tsp soy sauce

  • 1 tsp fish sauce

  • 1 Tbsp rice wine

  • 2 oz mung bean noodles (re-hydrated and chilled)

  • ¾ cup shredded raw carrot

  • 1 ½ cups shredded lettuce

  • Spring roll rice wrappers

RECIPE PREPARATION

  • Place pork in a large saute pan over medium heat. You can use some oil, but I prefer not to since the pork has a decent fat content. Cook, breaking up into small pieces for about 8 minutes or until browned on most sides and starting to get crisp. Push pork to the sides of the pan to make space in the middle. 

  • A decent amount of fat should make its way into the middle, if there is not a perceptible layer of oil then hit the pan with a little evoo or canola. Place shallots, garlic, and lemon grass in the middle and cook for about 2 minutes or until fragrant. Incorporate with the pork, then push the mixture out to the sides, creating a space once again. 

  • Drop the shrimp and green curry pastes into the center of the pan, and hit it with the rice wine, soy sauce, and fish sauce which will help the pastes dissolve. Incorporate quickly, cooking for about 2 minutes then remove from heat.

  • Fill a large mixing bowl about half-way with luke warm water. Submerge your rice wrappers for 10-15 seconds. I used two at a time since the brand I used was very thin, some might be fine solo or require more or less time. As soon as the edge get soft, take wrapper out of water and place on a clean plate. 

  • Place a small amount (⅓ cup-ish) of the pork about 1 inch from one side of the wrapper, keeping it centered, and making an oblong shape. Place carrots, lettuce, mung bean strands and any ther flavor toppings on top or just to the inside of the meat. Turn the ends of the wrapper over the short ends of the oblong shape, pressing with your fingers so they stick. Roll from the long side, burrito-style, until fully wrapped. Not super tight, but just so it won’t fall apart. Repeat until meat or wrappers run out.

  • Serve with a sweet or spicy dipping sauce

Anxiety & Brunch: Tortilla Española

I was going to title this post “Ode to Brunch” or “Gay Church” or something equally predictable and launch into a long-winded lament about missing brunch, but I decided to stay positive and leave that for day like, #157 of social distancing... Instead, I’ll reflect for a moment on the idea of letting perfect get in the way of the good, and finding the value and eventual pleasure in imperfections and vulnerability. Now don’t worry, I’m not going to get that deep, but hear me out. As much as I am doing this blog and video series for “fun”, the amount of anxiety I have about, well, EVERYTHING, can be overwhelming. Camera angles, background noise, forgetting my recipe steps, awkward umms, saything something stupid, not to mention wardrobe and hair, the minutea and worry all but sucks the life out of the process before I have even thought about what people might think of the final product (gay gasp). It’s made me want to scrap the whole idea more than a few times. But despite glitches and trepidation, I haven’t given up yet, heck I really only  just started.

In addition to the execution anxiety, I’ve realized I also suffer from imposter syndrome; like, ‘why would anyone want to watch or care what I am cooking?!’ You know, the ‘who am I to share a recipe?!’ kind of self-doubt that many of us feel in various parts of our lives and careers. Well, sorry to spoil it for you, I don’t have the answer, and I definitely still feel all that. All I know is I like cooking and sharing it with others, and this is just another way to do it. What I can share though, is that in the fits and starts I faced trying to do the first video, I found myself letting the desire for it to be perfect, for it to be infallible to those who would call me imposter, were getting in the way.  I was using them as an unspoken excuse not to start, much less follow through. I would groan and point to a burnt out light bulb in the kitchen or a missing ingredient for garnish, and just cancel, pushing the project off to another day. 

By finally convincing myself to shoot the first video and ultimately click ‘share’, I forced myself to accept the eventuality of imperfections and embrace the vulnerable place it leaves me. The truth is, the feedback and criticism I receive can only lead to improvement, even if it makes me squirm a little bit. While it’s not wrong to strive for perfection, it’s an ever iterating process and a continuum I just need to accept. But improvement opportunity aside, the true gem I have gleaned from all this is that I can’t let perfect get in the way of the main objective, pleasure. By pushing the limits of my comfort zone in this process, I’ve learned, or maybe accepted, that the pleasure I take in planning, cooking, and sharing a meal, now via video, comes by a process that will always be perfectly, imperfect. By some miracle, I am now OK with that. 

So to wrap it all up, and more importantly, tie this all to my recipe, I’ll reflect that this an approach I have always taken in my cooking (even before the cameras). I might not have all the ingredients on hand, could be running short on time, or I might skip a step accidentally, but I almost always find a way to season or otherwise adjust to create something enjoyable and delicious. While I work on the mental health project that is extending this principle to the rest of my life, I’ll offer any reader or viewer the advice to extend this flexibility to this particular recipe and really, all kitchen endeavors. This recipe works just as well if you swap out ingredients based on availability or preference, as long as the framework stays in place and proper attention is paid to flavor, texture, and appearance. If you’re tasting, touching, and keeping a watchful eye, you’ll be able to navigate most any culinary challenge you encounter and create something you enjoy. 

So, Tortilla Española is not a dish that is typically limited to or even really associated with brunch in its birthplace. It’s enjoyed in many ways, throughout the day as a filling for bocadillos or late at night as a tapa to accompany a glass of wine, and is as much beloved as it is ubiquitous in Spain. As its most basic, Tortilla is a tender layered, omelette with potatoes and onions. This interpretation leans a little heartier and it meant to be a main course for brunch. We are still honoring its Spanish origins, however, by adding Iberian inspired ingredients like savory chorizo, rich manchego cheese, and a healthy dose of fragrant smoked paprika. This dish is great served warm right from the oven but also makes a delicious chilled leftovers breakfast or lunch. 

Check out the video on YouTube HERE & Happy Brunching!

INGREDIENTS

  • 3 cups shredded hash brown, previously frozen allowed to come to room temp

    • I used what I had in my freezer, but 1 ½ lbs fresh potatoes sliced about ⅛” think would work fine too 

  • 6 eggs

  • 1 cup yellow onion, finely chopped

  • 1 cup manchego cheese, finely grated

  • 6oz chorizo, small dice

  • 1 tsp ground black pepper

  • 1 tsp garlic powder

  • 1 Tbsp smoked paprika 

  • Salt to taste (chorizo is pretty salty so I didn’t add any)

RECIPE PREPARATION

  • Heat ¼ cup oil in a cast item skillet over medium heat. Add onions and potatoes and cook, stirring often, for about 5 minutes. 

  • Meanwhile, using an immersion blender, whip the eggs until they have increased in volume by  half. You can do this by holding the blade, just slightly above the liquid line so air is circulated (just mind splashes). This can also be done by hand, but just takes a bit longer and requires some elbow grease. 

  • Once potatoes are warm, add black pepper, garlic powder, and smoked paprika and incorporate. Pour potato and onion mixture into a large bowl, being sure to scrap all the bits off the skillet, you want it nearly clean. Place the skillet back on a very low flame (you do not want it to lose heat).

  • Pour egg, chorizo, and cheese into potato mixture, and incorporate. When ready, turn the heat back up to medium on the skillet and generously butter all surfaces. Add the egg and potato mixture immediately and quickly even out the top. Cook, undisturbed for 2-5 minutes until the edges bubble and you can perceive a crust forming. Place in a 375 degree oven and bake until the top is golden brown and the center is no longer jiggling ~10-15 minutes. Let the tortilla cool slightly before placing a plate on top of the skillet. Carefully turn the tortilla over onto the plate to serve. 

YouTube Premiers: Cioppino Pasta

I made it through my first video cooking tutorial and YouTube premier without having a complete nervous breakdown, so that was a win. For my second go-round, I decided to do a riff on Cioppino. Cioppino was a natural choice as it is one of my favorite dishes of all time, a rich, brothy stew, flowing over with decadent seafood and fragrant herbs. I have recently been fortunate enough to prepare it for my in-laws’ annual Feast of the Seven Fishes around Christmas time, and it has quickly become one of my most cherished past times. Cioppino originated in San Francisco, California, but at the hands of an Italian immigrant from Genoa (who later went on to be a famous restaurateur). So, while truly American by birth, it has many aspects and a flavor profile that is very Italian in nature, and probably why I love it so much. In its purest form, Cioppino is a stew served with crusty bread or something of the like. My version is a bit different in that we are going to build a broth, and then cook it down to become more of a sauce before serving it over pasta. Despite humble origins as a dock worker’s soup of ‘fish scraps’, Cioppino these days is usually teeming with luxury ingredients like shrimp, clams, and crab legs. My version is a bit more pantry and budget friendly in that we are using Atlantic cod fillets, usually one of the most readily available and reasonably priced fish available, and clam juice to achieve all the briney goodness (rather than the costly or elusive bi-valves and crustaceans themselves). I mentioned fragrance before, and this recipe is definitely a treat for the olfactory. I used lots of dried thyme, oregano, basil, and the anchor ingredient of fresh fennel is always a treat for the nose (just make sure you take the time to cook until soft and let the licorice edge come off). You can use fresh herbs, add more of one, or even skip an ingredient or two, but if you let this dish simmer long enough, you’ll develop a lovely, savory, seaside flavor. Check out the video on my YouTube channel Christopher Cooks and Enjoy!

INGREDIENTS

  • ¼ cup extra-virgin olive oil

  • 4 tbsp. Butter

  • ⅓ cup clam juice

  • ¼ cup shrimp stock

  • 1 ½ cup mire poix, chopped

    • 1 medium yellow onion, peeled and chopped

    • 1 medium carrot, peeled, trimmed, and chopped

    • 1 rib celery, chopped

  • 1 leek, white part only, trimmed, cleaned, and chopped

  • 1 small fennel bulb, trimmed and chopped, fronds reserved

  • 2 tbsp. tomato paste

  • 4 bay leaves

  • 1 tsp. dried oregano

  • 1 tsp. dried thyme

  • 1 tsp. dried basil

  • 2 pinches crushed red pepper

  • 1 (28-oz.) can crushed Italian tomatoes

  • 2 cloves garlic, minced

  • 1 1⁄2 lb. cod filet, cut into large pieces

  • 1 lb fresh pasta,

    • I used Rigatoni, but any shorter shape will work, I would not suggest anything long like linguini

  • ½  cup dry white wine

  • ½ pound white Russian kale, stems removed, thinly sliced 

    • Any other green will substitute well, just ensure you massage until tender if using green or lacinato kale

  • Salt and freshly ground black pepper

RECIPE PREPARATION

  • Heat ¼ cup oil and butter in a large pot over medium heat. Add onions and cook, stirring often, for about 2 minutes. Add carrots, celery, leeks, and fennel and cook, stirring often, for about 5 minutes or until soft. Add wine, crushed tomatoes, tomato paste, clam juice, shrimp stock, 2 cups water, oregano, thyme, basil, and crushed red pepper and season to taste with salt and pepper. Bring to a boil, reduce heat to low, and simmer, stirring occasionally, for 30 minutes or reduced by ⅓ to ½.

  • Meanwhile, cook pasta until just al dente or slightly under-done. You will let the pasta complete cooking in brothy sauce

  • Taste soup, and add salt, pepper, more herbs or spices to taste. Once flavor is right, bring heat up and add kale, working in quickly, cooking until withered, about 1 minute.

  • Add cod, and cook, stirring very gently so fish does not completely fall apart.

  • Add cooked pasta and incorporate.

  • Cook until fish is just firm, ~3-6 minutes.

  • To Serve: Ladle into large bowls, garnish with fennel fronds

Wanderlust: Sambal Bolognese

Apparently I am on a travel obsessed kick, which is either an insane way to torture myself during this lockdown or a healthy dose of escapism….that’s to be determined. Either way, it’s clear to me that I’ve been using meal planning and preparation as a way to travel outside my kitchen, my street, my neighborhood to transport at least my tastebuds and my mind to far flung locales currently unreachable in body. This particular recipe was inspired by the most recent bon Appetit issue aptly titled Recipes to Transport You. The original that inspired my riff, references two rather geographically distinct culinary realms. The first is Bolognese sauce which while specific in name and style to Bologna, makes me think of the spectrum of delicious Italian ragu’s originating from up and down the boot, many of which I’ve been lucky enough to sample and even try my hand to cook. The second reference is to Sambal Oelek, a bright and spicy chili paste with Indonesian origin but whose flavors permeate the universe of south east asian cuisine and many of my favorite dishes from the diverse food cultures across the region. The first time I made this, the process and the smells really sent me. I closed my eyes, and one moment I was immediately back in the farm kitchen at Le Ragnaie (an idyllic agritourismo in Montacino) slowly making Ragu di Carne, and the next I was fantasizing about the exciting plates and flavors I would encounter the first time I am able to make a long planned visit to Shilin or Hoi An night market. I’ll admit this must have all looked very strange, and a little bit dangerous to my husband, who was looking on as I slugged wine and clearly lost myself in day dreaming wanderlust while standing over an open flame. But judge me he did not, these are tough times, and I think he knew this dish offered me a much needed escape.

So, there are a few aspects to my interpretation of this dish that I want to call out. First, this recipe does have a very pantry centric vibe, which was an immediate draw considering my limited ability to get to the store on a whim. The staples like, tomato paste, butter, sugar, soy sauce, and heck, even the use of dried ramen noodles mean the ingredient list should not present a particular procurement challenge and many people will have most on hand. Second, I decided to make a very specific addition to the original recipe; chicken livers. Ever since the cooking lesson in Montalcino I referenced earlier, I have always added pureed chicken livers to all my red sauces. Livers add a really nice, unctuous depth to those sauces, and I thought this particular dish was a great opportunity to add richness to the sauce in this way. While I usually find chicken livers easily at the supermarket or from the poultry purveyors at the farmers market, I will acknowledge they may be hard to find, so I want to be clear this is a totally optional ingredient and step. Which brings me to my next and final point;  there are a number of optional ingredients and possible substitutions throughout this recipe. Given the market access and scarcity issues many are facing right now, I thought it would be helpful to point out where something could be omitted or swapped out without compromising the dish. I wanted to make sure this was a recipe that rather than scare anyone away, made folks excited to hop into their pantry and embrace this spicy-sweet adventure. Bottom line, this is a flavor trip you do not want to miss!

INGREDIENTS

  • 2 Tbsp. extra-virgin olive oil

  • 2 lbs. ground pork (any ground meat works fine, just add a little oil for leaner meats like chicken, and drain some fat from the pan from fattier like beef)

  • 1 2" piece fresh ginger, peeled, minced (ground works too, about 1 tsp.)

  • 8 garlic cloves, minced

  • 5-8 scallions, whites and greens finely chopped, reserve darkest greens and finely slice on a bias for garnish

  • 3 Tbsp. tomato paste

  • 2 sprigs basil for garnish

  • ⅓ cup hot chili paste (such as Sambal Oelek, Sriracha would work too, just mind the heat)

  • ¼ cup soy sauce

  • ¼ cup unseasoned rice vinegar (white vinegar is fine too)

  • 12oz. dried ramen noodles (or 16 oz. dried spaghetti or any long dry noodle)

  • Kosher salt

  • 2 Tbsp. salted butter

  • Optional Ingredients:

  • ½ cup chicken liver, pureed

  • 1 Tbsp. spicy broad bean paste

  • 1 Tbsp. lemon grass, about 1 stick smashed and finely chopped

  • Sliced serrano or thai chiles for garnish 

RECIPE PREPARATION

  • Heat oil in a large wide heavy pot over medium-high. 

  • Add 1lb ground pork to pot, breaking apart into 6–8 large chunks with a wooden spoon. 

  • Cook, undisturbed, until well browned underneath, about 5 minutes.

  •  Turn pieces and continue to cook, turning occasionally, until pork is browned and crispy on 2–3 sides, about 5 minutes longer. Move to the side of the pan.

  • Add chicken livers and cook until browned, scraping the browned bits from the bottom of the pan 2-3 mins. Incorporate into crispy pork and again, move to the sides of the pan.

  • Add ginger, garlic, lemongrass, scallions, and a little bit of oil and cook for 1-2 minutes allowing the ingredients to get fragrant.

  • Add remaining pork to pot and cook, breaking up meat into small clumps, until meat is nearly cooked through, about 5 minutes longer. 

  • Add tomato paste, chili paste, bean paste, soy sauce, vinegar, and 2 cups water. Mix well until no longer clumpy.

  • Bring to a simmer, reduce heat to low, and cook, uncovered and stirring occasionally, until sauce is slightly thickened and flavors have melded, 30–45 minutes.

  • Meanwhile, cook ramen noodles in a large pot of boiling salted water, stirring occasionally, until 1 minute short of al dente. 

  • When flavors are developed, add cooked noodles to pot with sauce along with butter and a splash of pasta cooking liquid. 

  • Simmer, tossing occasionally, until sauce begins to cling to noodles, about 1 minute. 

  • Divide noodles among plates or bowls. 

  • Top with fresh basil leaves and reserved scallions.

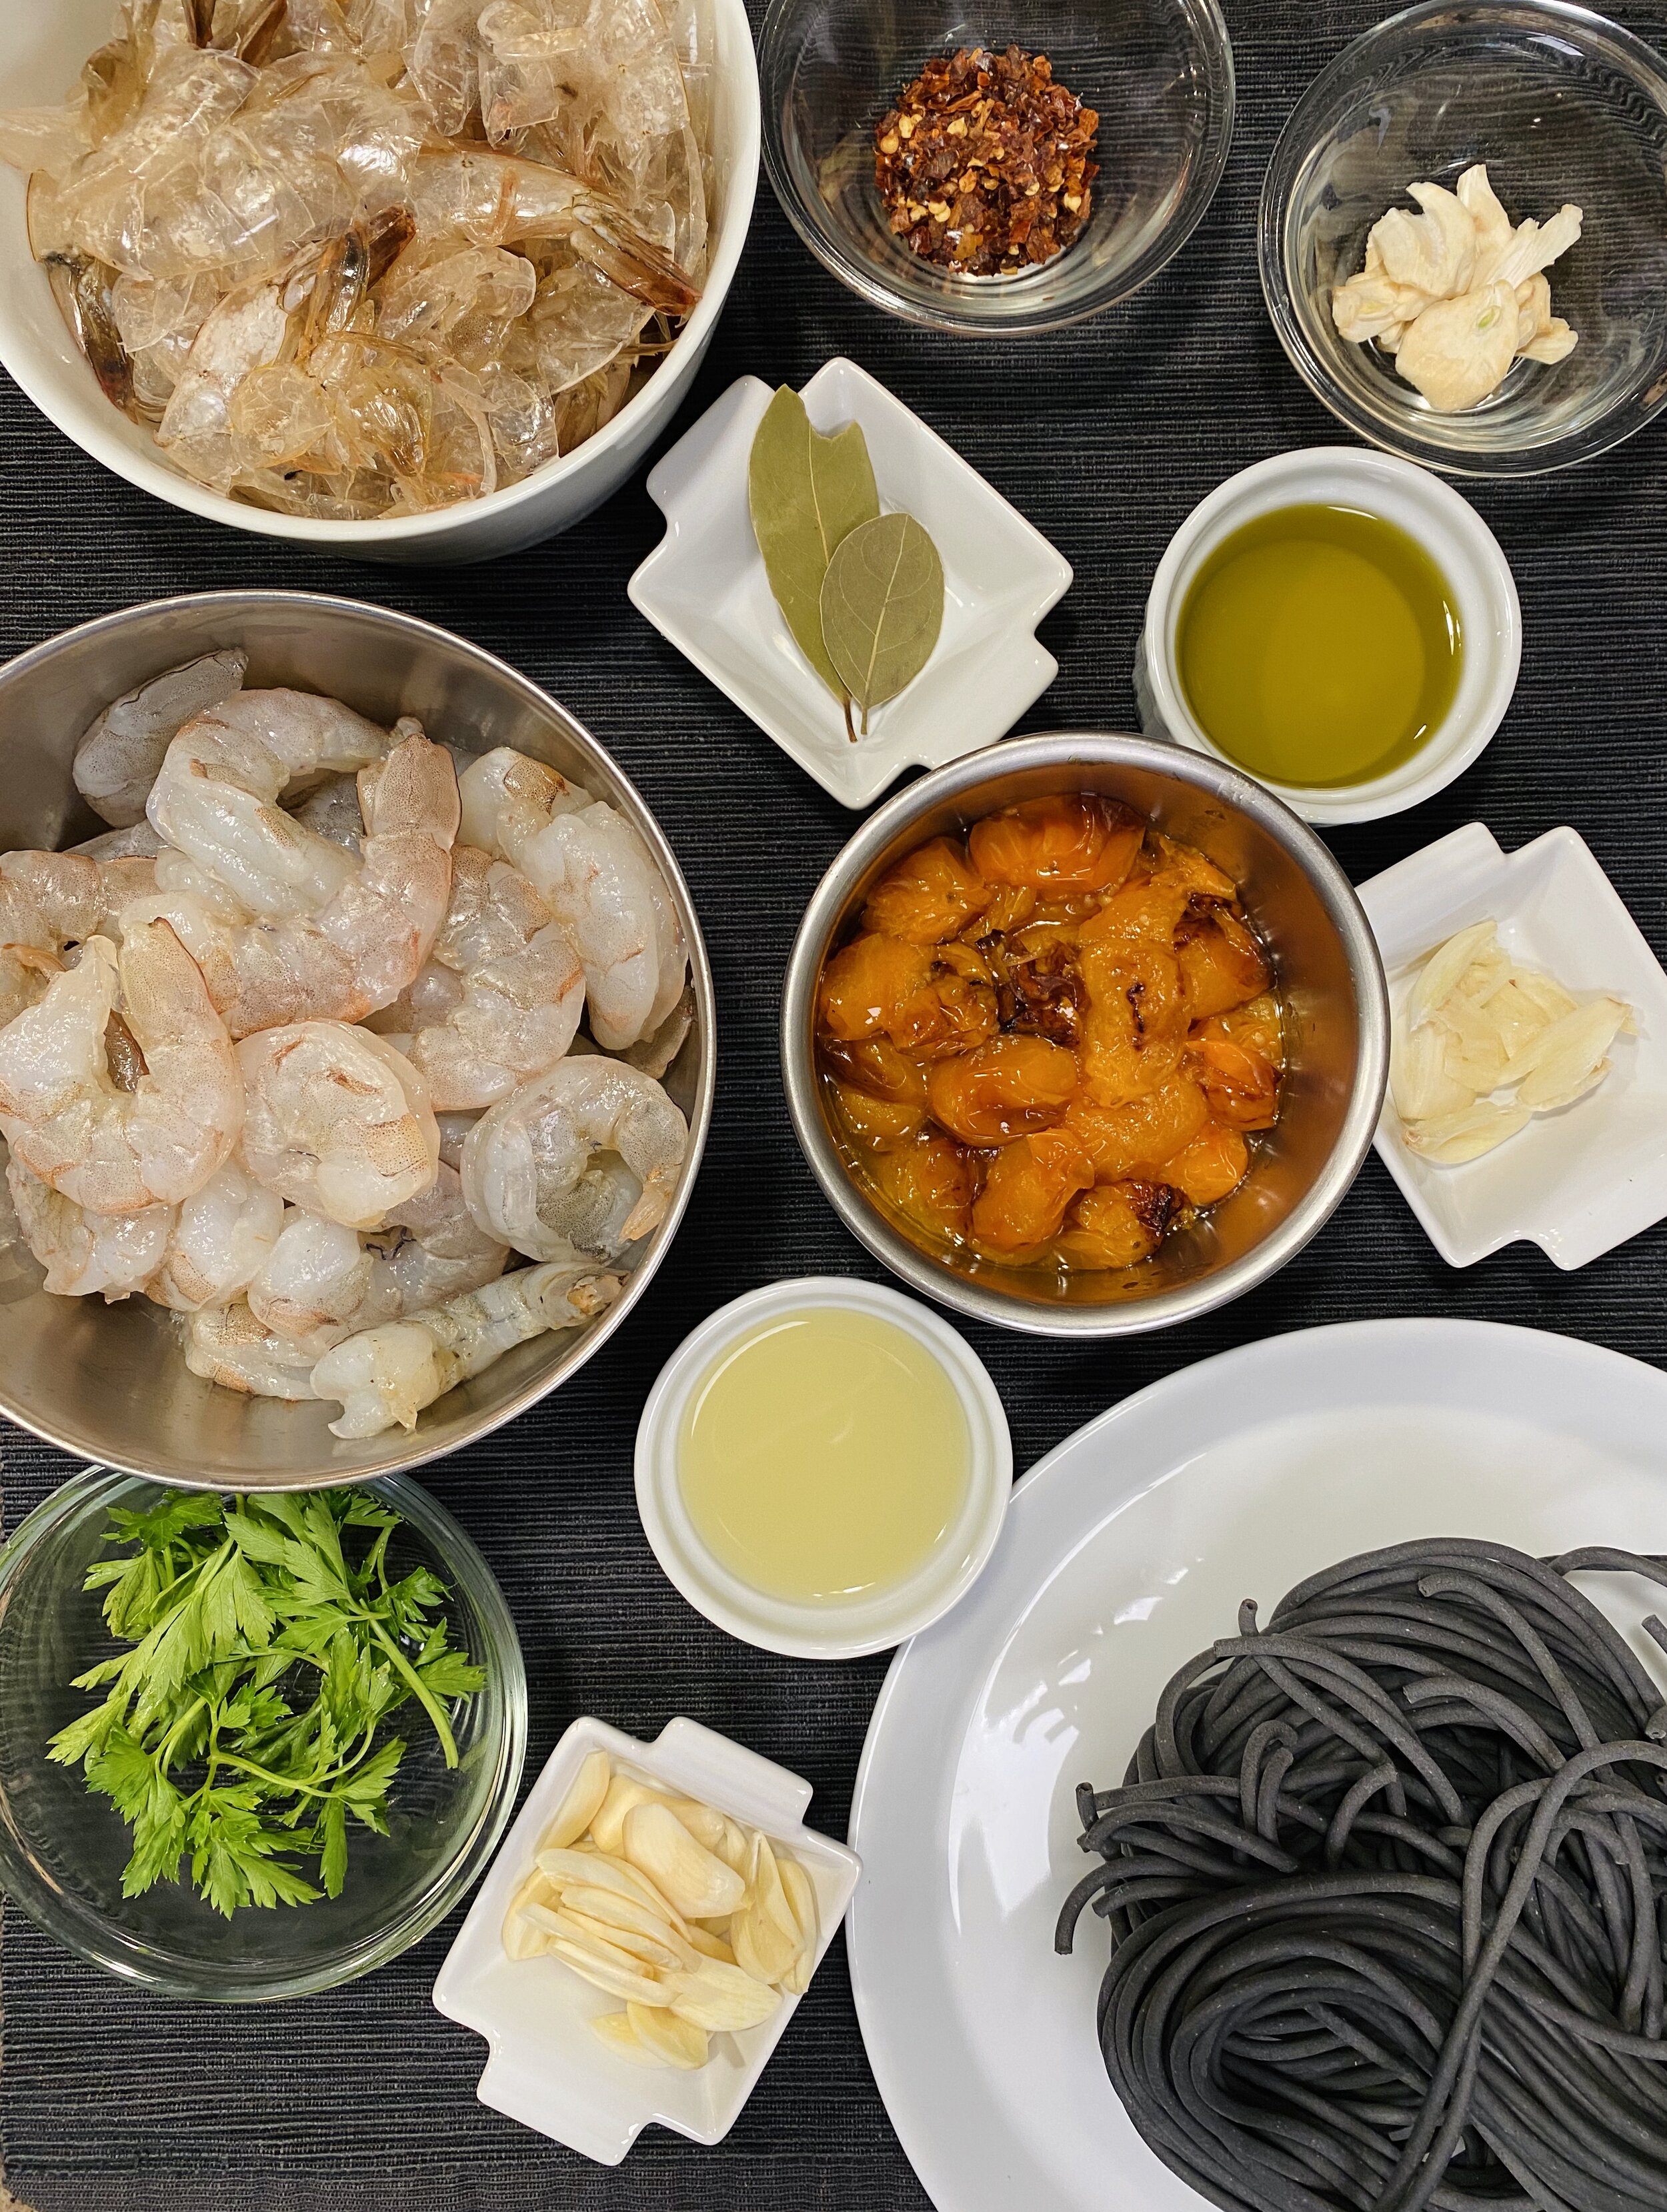
Amalfi Dreamin': Squid Ink Pasta & Shrimp in Brodo

So Monday’s recipe selection is one of those that was truly born of inspirational ingredients. When possible, I like to shop with very little in the way of a framework in mind, preferring to do my meal planning around what I find that looks good that way I can take advantage of spectacular market finds. Now the current pandemic has certainly curtailed my browsing ability, and definitely forced me to take a more intentional approach, so I’ve developed a pretty efficient shopping strategy which still affords me the opportunity for pleasant surprises at the weekly Saturday, 32nd Street Farmers Market in Baltimore. That said, I’ve been making a habit of picking up a bag of fresh pasta every week from Impasta Artisans. Impasta is start-up, helmed by DC restaurant veterans that was pretty much born out of these turbulent times and the need to use ingredients and supplement income while dine-in activities are suspended (check them out on IG: Impasta_artisans). One of my fave little produce stands (San Giovanni’s Farm) has been part of their distribution network and I’ve loved everything I have gotten so far (remember Pasta Alla Norma from IG? That was their Rigatoni). This Saturday I was early to the market, and was fortunate enough to arrive at this particular stall in time to find myself staring at a lone container of squid ink spaghetti that was dark as night and seemed to be calling out to me (not really, but I did snatch it right up). It was one of those inspo moments! I was immediately transported to the Italian coasts; sunshine, seafood, sparkling waves, briny flavors, the smell of lemons filling the breezes as they whip around spectacular cliffs and float through fabulous Palazzo courtyards...pure heaven. I figured, while stuck at home, why not use this opportunity to let dinner transport us to the Amalfi coast and indulge my Italian fantasy. 

Now, this recipe is actually pretty simple, the ingredients are usually easy to find, and generally do not require a lot of prep. I found some adorable golden cherry tomatoes that I decided to blister to add to the sauce, but canned or jarred substitutions would work just as well. On a visual note, I originally had this instagram vision of inky black pasta, plump pink shrimp, ivory slivers of garlic, and fiery red calabrian chiles in my mind, but I had to settle for green thai peppers just based on availability but I think it turned out just fine. Finally, one important process note is that this recipe does call for using shrimp shells to make a stock. While not critical, I highly recommend opting into this step. The process is not complicated, but it does take a little bit of time, and is OH SO worth it. The briney stock combined with the brightly acidic tomato sauce and the rich butter is what gives this dish its umami tones and makes it so luxurious despite the relative simplicity. I hope you enjoy!

Squid Ink Pasta, Shrimp, Cherry Tomato Brodo & Crispy Garlic

Inspired by a recipe from Bon Appetit by Dawn Perry

INGREDIENTS

  • 1 pound large shell-on shrimp

  • 3 tablespoons olive oil, divided

  • 6 garlic cloves, divided, 2 smashed, 4 thinly sliced

  • 1 bay leaf

  • 1 cup blistered cherry tomatoes

  • (tomato passata or puréed whole peeled tomatoes are a fine substitute)

  • 3 Tbsp. salted butter

  • 12 ounces squid ink spaghetti 

  • ¼ cup fresh lemon juice

  • ¼ cup chopped fresh parsley, plus more for serving

  • ¼ cup red Calabrian or green Thai chiles, finely sliced

  • 1 Tbsp. crushed red pepper

  • Salt & ground black pepper

  • Pecorino Romano to serve (optional)

  • Crispy Garlic 

RECIPE PREPARATION

  • Peel and devein shrimp, saving shells.

  • Heat 1 Tbsp. oil in a medium saucepan over medium-high and cook smashed garlic, stirring, until golden, about 1 minute. 

  • Add reserved shrimp heads and/or shells and cook, stirring, until bright pink, about 2 minutes.

  • Add bay leaf and 2 cups water and bring to a boil. 

  • Reduce heat and simmer until stock is slightly reduced and flavorful, 8–10 minutes. 

  • Strain through a fine-mesh sieve into a large bowl; discard solids.

  • Heat remaining 2 Tbsp. oil in a large skillet over medium-high. 

  • Add sliced garlic and cook, stirring, until fragrant, about 1 minute. 

  • Remove skillet from heat and carefully add tomatoes, butter,  and 1 cup stock.

  • Return to heat and cook, stirring occasionally, until sauce is beginning to thicken, about 3 minutes.

  • Reduce heat and simmer, stirring occasionally, until flavors have melded, about 3 minutes. 

  • Stir in reserved shrimp and cook, stirring occasionally, until opaque, about 2 minutes.

  • Meanwhile, cook pasta in a large pot of boiling salted water, stirring occasionally, until very al dente (if using fresh pasta, this will take just a moment or two). Drain pasta, reserving 1½ cups pasta cooking water.

  • Add pasta and 1 cup pasta cooking water (only if it looks like it needs more liquid) liquid to sauce and cook, tossing often and adding more cooking liquid to help finish cooking pasta, until pasta is al dente and sauce is thickened (but still saucy) and coats pasta, about 5 minutes. 

  • Add lemon juice and ¼ cup parsley; toss. 

  • Taste and season with salt and pepper. 

  • Serve pasta topped with more parsley, chiles, crispy garlic, and pecorino romano.

Farmers Market & Freezer Finds: Grilled Swordfish & Eggplant Caponata

How am I coping with these unprecedented times you ask? You didn’t ask, but I answer you none-the-less, NOT WELL. I mean, to be fair, aside from constantly trying to find new ways to channel my anxiety and internalize my rage against the administration and its disregard for science or human life; I have managed to put together a few coping mechanisms. For one, I do cherish my Saturday morning socially-distant forays to the essential business that is the 32nd Street Farmer’s Market in Waverly in order to leverage a single trip to both procure my food for the week and support the farmers and vendors who so need it in this time. I’ve also been using the common sense guidance to limit trips outside the home as a reason to go treasure hunting in my freezer for delicacies bought on a whim or “on sale” but long forgotten during the days of daily Whole Food’s stops and dining out in actual restaurants. Tonight’s recipe was born of the two. I picked up some gorgeous courgettes (eggplants if you’re #basic, but I am basic so heretofore referred to as eggplants) this weekend and had been agonizing over how to use them this week in a way that didn’t involve stuffing them or turning them into some twist on babaghanoush (those are just trusty and tired TBQH). In a stroke of brilliance, fate would have me clamoring around my freezer one night after too much wine reaching for ice cream i really didn’t need only to have my hand alight on a pair of swordfish steaks I had tossed into the abyss a month or so ago. I never found that ice cream, and perhaps that’s for the best, but I did have the wherewithal to put the swordfish in the fridge to defrost. And here we are! Swordfish and Eggplant are like the odd couple. They can both be hard to pair with anything else, but somehow together, the herbal eggplant and mildly sweet but definitely meaty swordfish just WERK! You can tell by this point that I’ve had happy hour wine, I’m glad that’s out there in the open. Ok, so a quick flip through the online annuls of Food & Wine, Bon Appetit, and Savuer and the decision is made; Grilled Swordfish & Caponata is on the menu. As is typical, I did my own riff on both these components. For the caponata, I skipped the caper/olives that are typical, and added some smokey depth by grilling the eggplants and adding a bit of smoked paprika. For the swordfish, I used my go-to technique of brushing the steak with an aioli (seasoned mayo mixture) in order to lock in flavor and more importantly moisture, as swordfish has a propensity to get dry (at not-so-deft a cook’s hand). Hope you enjoy!

INGREDIENTS

For the Caponata

  • 2 medium eggplant, trimmed

  • ½ cup evoo, plus more for the grill

  • 2 Tbsp. pine nuts

  • ¼ cup red wine vinegar

  • 1 medium shallot minced

  • 2 Tbsp. drained capers, finely chopped (optional)

  • 1 Tbsp. dried oregano, plus fresh sprigs for garnish (all fresh is fine too)

  • 1 teaspoon smoked paprika

  • 2 teaspoon crushed red pepper

  • 3 medium heirloom tomatoes, halved, thickly sliced

  • Sea salt, freshly ground pepper

    For the Fish

  • 2 10-oz. swordfish steaks, about 1" thick

  • ½ cup mayonnaise

  • 1 teaspoon garlic powder

  • 1 teaspoon dried thyme

  • 1 teaspoon ground white pepper

  • 1 teaspoon ground black pepper

  • 1 teaspoon smoked paprika

  • 1 lemon

RECIPE PREPARATION

  • Prepare a grill pan for medium-high heat; lightly oil. 

  • Peel eggplant lengthwise to create alternating 2-inch-wide intervals of peeled and unpeeled skin. 

  • Cut eggplant crosswise into 6 slices, each about 1 inch thick. 

  • Brush eggplant slices with oil; sprinkle with salt and pepper. 

  • Grill eggplant slices until charred and very tender when pierced with knife, about 8 minutes per side.

  • Toast pine nuts in a dry small skillet over medium heat, shaking often, until golden, about 4 minutes. 

  • Let cool and set aside for serving.

  • In a small bowl, combine mayonnaise with garlic powder, herbs, paprika, and ground peppers to aioli. 

  • Pat swordfish dry and place on a rimmed baking sheet, let sit at room temperature 15 minutes.

  • Meanwhile, whisk vinegar, capers, shallots, crushed red pepper, paprika, oregano, and ½ cup oil in a small bowl to combine; set marinade aside.

  • Arrange tomatoes and grilled eggplant slices on a platter, overlapping slightly; set aside. I used an oven safe platter, so I placed this platter in a 200 degree oven so that my caponata would be warm, totally optional.

  • Brush swordfish on one side with aioli and grill (brushed side down) undisturbed, until grill marks appear, about 4 minutes brushing mayo on dry side.

  • Carefully turn over and cook on second side until fish is opaque all the way through, about 4 minutes. 

  • Transfer to platter with tomatoes and eggplant.

  • Season with salt and pepper. 

  • Pour reserved marinade over and let sit at least 15 minutes and up to 1 hour (again, mine was on an oven safe platting, so this spend 15 minutes maintaining heat).

  • To serve, scatter reserved pine nuts over top and garnish with fresh oregano sprigs

D6AE4D83-EED0-45AE-8BD0-F958DF07008E.JPG

Homage to Esquites

Many of my fondest food memories come from my time living in Guadalajara Mexico. While I’ll probably never be able to decide on an absolute favorite, I can say that come summer, there is nothing better than when the corn comes into season and you can find Elote stands on every corner. Many a sunny Sunday I spent strolling Tlaquepaque with a blistered corn cob in hand, covered in crema, cotija, chilies, and lime. This drool worthy, and addictive snack is often also served in a bowl with the addition of mayo and goes by the name of Esquites. With the bounty of Maryland corn reaching it’s peak at the local farmer’s market, I decided it was the perfect opportunity to relive some of these tasty moments by creating a homage to my beloved Mexican Elote and Esquites. I served this with grilled swordfish, but it great along side any protein or even as a stand-alone salad with the addition of shrimp or chicken. This is a simple recipe, perfect for a picnic or the dinner table as it can be served chilled, room temp, or warm. Enjoy!


Ingredients:

  • 6 ears of fresh corn – I used both white sweet and bi-color corn from Baltco. Farmer

  • 1 bunch green onions – finely sliced, 1/3 of green tips reserved for garnish

  • 1 small white onion – finely diced

  • 3 cloves garlic – minced

  • 5 oz Cotija Cheese – finely grated (+ more to taste)

  • 1 Jalapeño or Serrano pepper – finely sliced (optional)

  • 3 tablespoons Mayo

  • Evoo or melted butter

  • 1 tablespoon Aleppo pepper flakes

  • 1 teaspoon crushed red pepper flakes (+more if you like spice)

  • 1 tablespoon Tajin (optional)


    Preparation:


    Charring the Corn: Brush corn with a light layer of olive oil or melted butter. Char on the grill, turning often until golden/brown, but not black. Alternatively, you can place cobs on a baking try, and broil on high, turning until evenly browned. Timing will vary greatly here, so this is a visual thing and may take some practice. Either way, a little extra char never hurts.


    Preparing the Esquites: Now, this prep is admittedly a bit more involved than a traditional street cart presentation which is generally grill-to-cup and has a refreshing crunch and spicy bite to it. My version leverages sautéing the onions and garlic to build a deeper flavor before mixing with the corn, allowing it to both achieve richness and maintain freshness. While your corn is charring, sweat green onions, white onions and garlic in olive oil until translucent but not browning. This should table about 5 minutes and that’s, you can remove from heat. Once corn is charred and has cooled enough to be safe to touch. Carefully use a sharp chef’s or paring knife to remove the kernels from cobs and add to sauté pan. Break up any large pieces with a spatula and combine with the sautéed alliums. While still a little warm, add half of the mayo and mix well (this allows the mayo to liquify and coat all the corn). Spoon into a non-reactive bowl and place in the fridge to cool. You can leave it in the fridge for a few hours if you want to serve the Equites chilled, or just 30 minutes to get them to room temp as I did. While corn chills, blend pepper flakes with olive oil until it forms a red paste. Set aside, you will use this to garnish the final dish. Once at the desired temperature, add tajin, remainder of the mayo, ½ the cotija and mix well. Move to your serving dish and top with the remaining cotija. Drizzle pepper paste on the top of cotija peak and garnish with remaining green onions and sliced Jalapeño.

public.jpeg
public.jpeg

My Antoni Moment - Green Curry Black Bass w/Chile Peanut Sauce

I have been in a little bit of a funk lately (mild depression, I might argue), due in most part to my lack of fulfillment in my day-to-day, 9-to-5 job. It varies in severity from general malaise to existential crisis about my total lack of authentic professional identity in my mid 30’s. Totally makes me a LOT of fun to be around. Needless to say, I have been searching for distractions and hopefully inspiration.

During one particular social media rabbit-hole, I happened upon R. Eric Thomas’ interview (link here) with Antoni from the new Queer eye. Yes, I know, the cute, white one with the disarmingly crooked smile and no perceptible talent that we all love to hate (especially after his smug Montreal pride appearance next to Monsieur Trudeau).

I was in a mood, so I obviously dove in ready for a full force reading of this one-dimensional-epicurean-wanna-be. R. Eric Thomas’ digital column on Elle.com, ‘Eric Reads the News’ has quickly become one of my favorites for its wit, humor, tea spillage, meme/gif usage, oh-so-timely topics, and mostly for the shade he artfully throws at his subjects. I was here for all the filth, everything we all want to say (and likely angrily spew at the television) when we see Antoni use avocado in every QE episode or explain how sour cream belongs in guac (ughhhhh). This was going to be a gratifying bloodbath!

To my surprise, Instead of shady indulgence, I was confronted with a jarring commonality with the subject. He recounted a young adulthood spent in every possible role in a restaurant, a passion for food and dining despite the trials of the service industry, turns out, we even have the same love language (Acts of Service if you hadn’t already guessed). I suddenly found myself an Antoni fan. Now, I am still waiting for him to get through a season without avocados, but I was (begrudgingly) inspired. Here is someone with no formal training, armed with little more than charisma and a passion for communing with food, really truly making it, and making the world a better place for it. I have always said, the truest way that I show love is through cooking for someone I care about. Food is love, and I live to explore the world’s cultures through experiencing that expression of life and love in all the wonderfully diverse ways  That is why I cook and why I am passionate about developing my own culinary perspective.

In reading this Antoni article, I realized what I needed to do to get myself out of my rut. I was bursting at the seams, thinking “that’s me, that’s me! That’s why I do this!” and I needed to come out as an Antoni fan. Just kidding, I need to cook. So, I committed to getting back in the kitchen. To force myself to get creative and find new and exciting ways to motivate myself and to show love.

My first venture was an ambitious one. I was still mourning Anthony Bourdain and naturally watching lots of “Parts Unknown” episodes featuring the best of Singaporean, Vietnamese, Laotian, Thai, and many other cuisines. Throughout these culinary traditions, whole fish are a common feature. I could not remember the last time that I cooked a whole fish, and figured why not dive off the deep end. I picked up some beautiful black bass at my local Whole Foods. Further inspired by flipping the pages of the June/July Bon Appetit featuring some vibrant and gorgeous summer compositions, I decided on a prep featuring bright flavors like lime, cilantro and green curry as well as savory and earthy notes from a soy, chile, peanut sauce. I won’t begin to appropriate and attribute this dish to any specific regional cuisine, but I humbly accept inspiration from around the south asian and caribbean traditions I have had the privilege of experiencing or observing in print or on screen.

I started the prep by rubbing the cavities of the bass with a Lobo Green curry paste I had been gifted by a fellow amateur cook and had just been waiting for the opportunity to use. I then stuffed the cavities with paper thin slices of lime and bunches of cilantro. To accompany the fish, I decided to char some green onions on my grill pan (@lecreuset) and wilt some baby greens in about a half an inch of miso broth. I prepped the sauce in advance, pulverizing roasted peanuts and combining them with a bit of soy sauce, sambal olek (chili garlic paste) and sesame oil. Once all the accoutrements were ready, I threw the fish on the grill pan for a few minutes on each side, just until the white flesh started to flake and the herbs heated to release their depth of flavor. I plated everything together. A bed of greens, web of grilled onions, fish placed whole and head-on over top, and finished with a generous drizzle of the chunky peanut sauce. It was gorgeous if I don’t say so myself.

I summoned Mark (my fiance) to the table, which didn’t take much convincing these flavors are some of his favorites and I took a deep breath, ready to bask in my Antoni moment.

My Queer Eye audition fantasy was shattered when I looked across the table at Mark who was staring in abject horror at the fish head on the platter in front of him. Rather than doe eyes and appreciation of my act of service and expression of creativity, to my dismay I was faced with fear and confusion. In all my fervor, I had forgotten that Mark is a zero-effort diner, and the prospect of navigating a whole fish, full of bones, much less one with a head, was going to be a non-starter. Despite my initial disappointment (and admitted oversight, fish heads really aren’t all that sexy) I was determined to have my Antoni moment, we were going to ENJOY this.

I slugged some sauv blanc and unceremoniously proceeded to de-bone his fish and painstakingly prepare his plate for him. With that out of the way, dinner was a smashing success. The fish was perfectly cooked, plump but flaky and possessing a deep flavor accented by the astringent cilantro and acidic lime. The peanut sauce was warm, bringing heat and a nutty note to the tropically inspired dish. We both cleaned our plates as I reveled in the enjoyment both he and I got out of the meal itself, and I rode my kitchen high into the second bottle of white wine. In the end Mark was thoroughly impressed by the flavors and creativity of the meal. I explained my inspiration and he was supportive of the efforts I had made and those that I had planned for the future in the kitchen. My re-entry into the kitchen was a success!


Recipe:

  • 2 whole black bass (cleaned, similarly sized)

  • 1 bunch cilantro

  • 1 packet Lobo Green Curry Paste

  • 1 lime (sliced in thin rounds)

  • 10 green onions

  • ½ cup roasted unsalted peanuts

  • 2 tablespoons sesame olek

  • ¼ cup soy sauce

  • 1 packet white miso soup mix

  • 10 oz baby greens

Prep

Sauce:

  • In a food processor, pulverize the peanuts until they are the size of peppercorns.

  • Place in a medium mixing bowl.

  • Add Sambel olek, soy sauce, and sesame oil and mix together. You will need to mix again prior to serving if anything separates

Greens:

  • In a large saucepan, bring 2 cups water to a boil.

  • Add miso packet and str until dissolved.

  • Add greens, turn off heat, and cover.

  • You can toss periodically to ensure they are evenly wilted and covered in the miso broth.

Grill:

  • Prepare the grill or grill pan with your preferred non-stick method (I use coconut oil spray for the heat tolerance).

  • Place green onions on grill and cook until they are charred.

  • Flip and repeat, the white ends should begin to turn translucent as the greens char. Remove from heat.

  • To prepare the fish:

    • Rub green curry paste on all surfaces within the cavity.

    • Place even amounts of cilantro inside and layer with slices of lime.

    • Tie with butcher's twine, if needed to keep together.

  • Add more oil, if needed.

  • Place fish on hot grill.

  • Cook for 3 minutes on each side. Black bass have delicate skin which will likely come off when the fish is moved. As you turn the fish, scrape off the skin that sticks to the pan and discard.

  • Cook for an additional 3 minutes or until the flesh on the inside of the cavity is opaque.

To Plate:

  • Place greens on large platter or shallow bowl.

  • Pour any remaining miso broth over top.

  • Place grilled onions over the greens.

  • Place fish on top.

  • Drizzle large lines of peanut sauce over the fish.

  • Garnish with any remaining cilantro fronds and lime slices.

  • Serve immediately.


Green Curry Black Bass